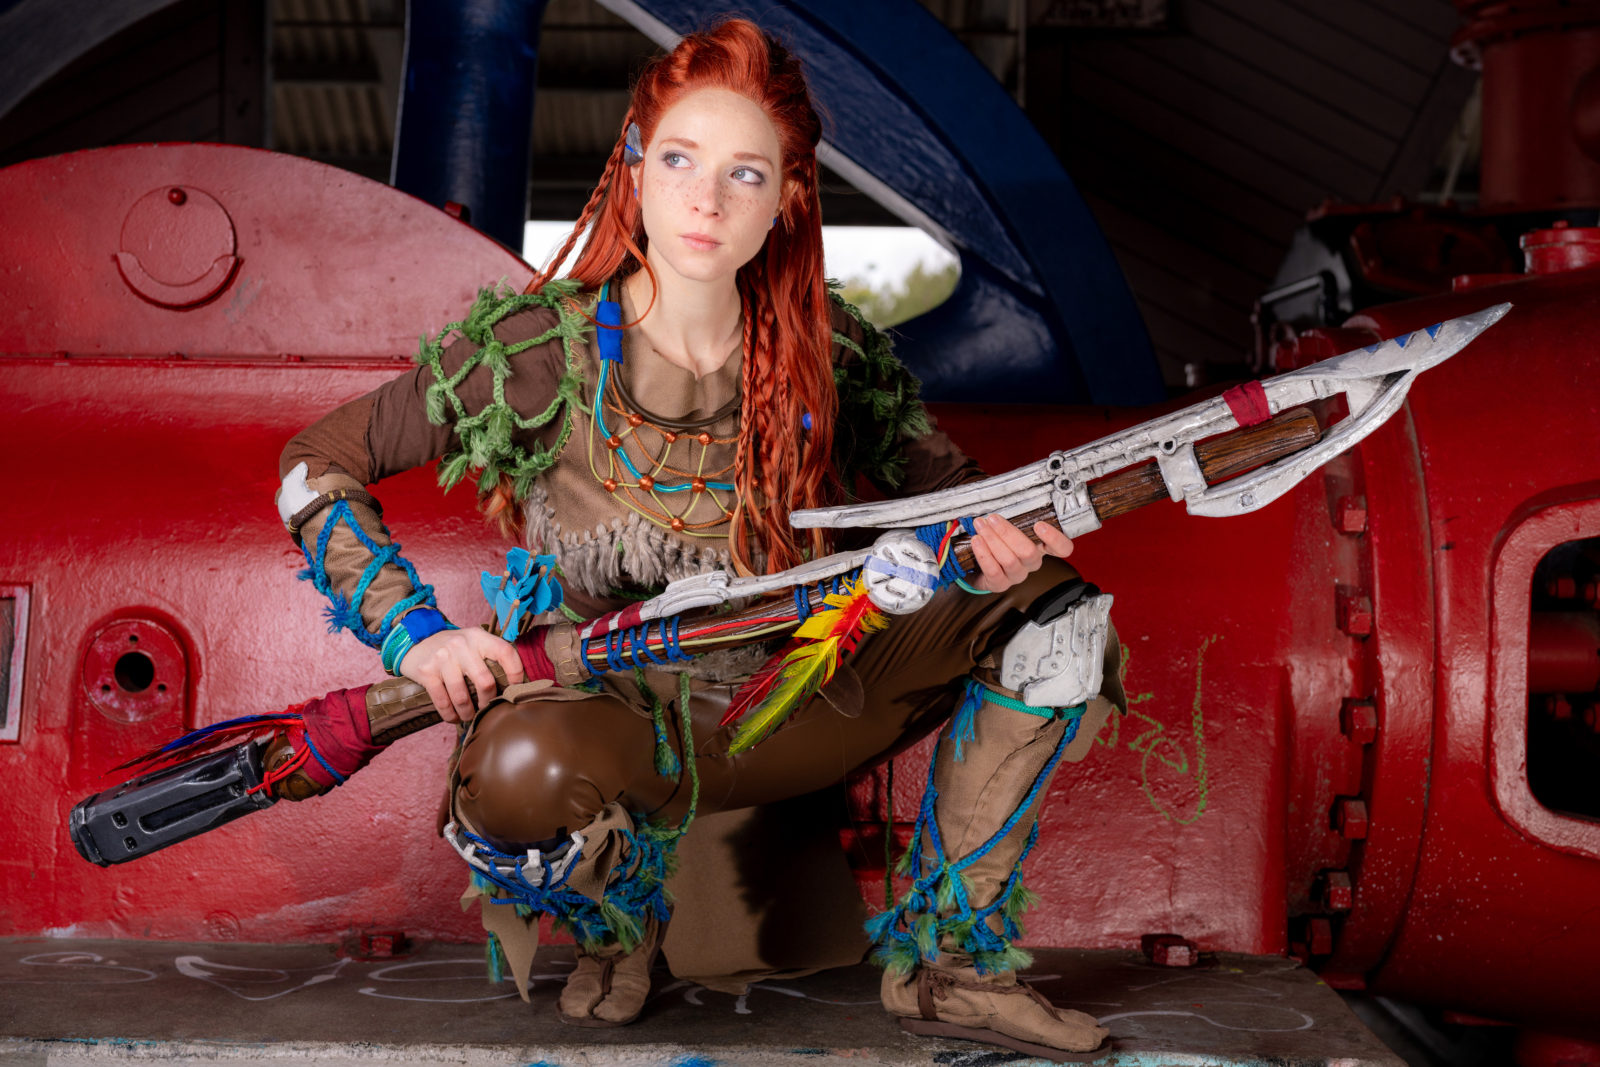
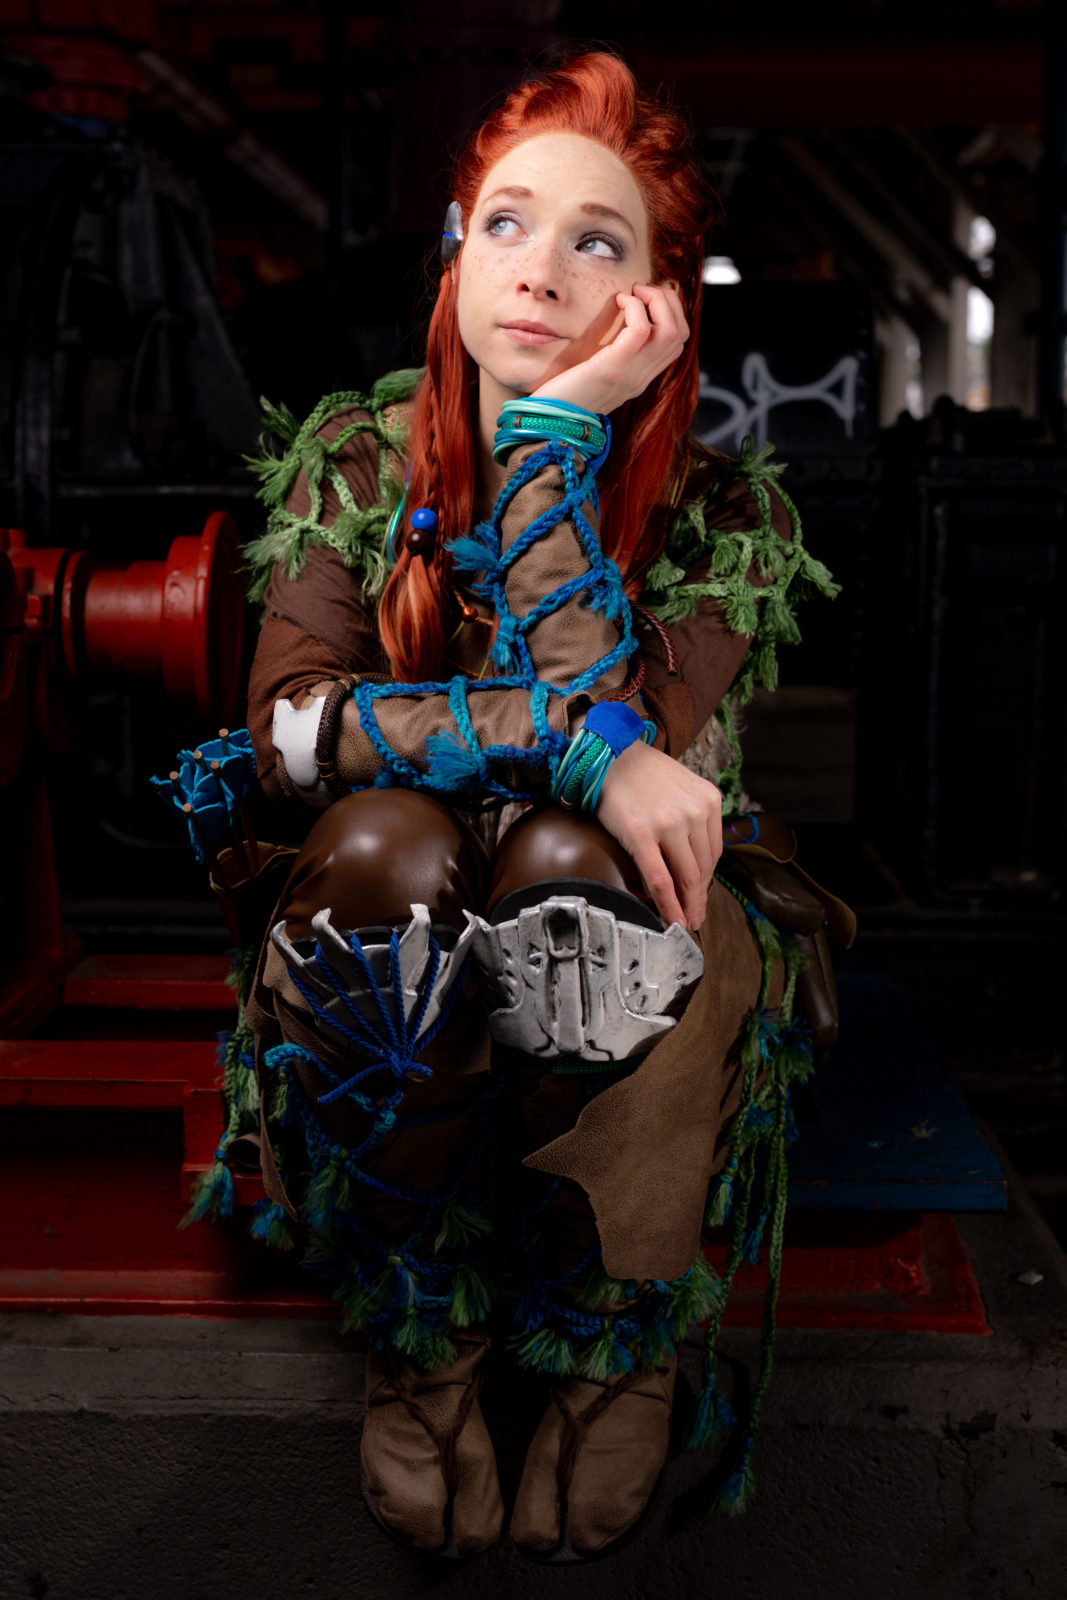
Only a few years late, but I finally got around to playing Horizon Zero Dawn, it’s such an incredible game! The story unfolds in such a satisfying way, and so many of the characters feel multifaceted and interesting, even the ones we don’t see much of. The design and detail put into the world make it incredibly fun to run around, explore and hunt robot dinosaurs. Even before I finished playing the game I knew I wanted to cosplay Aloy, as always I can’t resist a sassy redhead character with a great costume design.
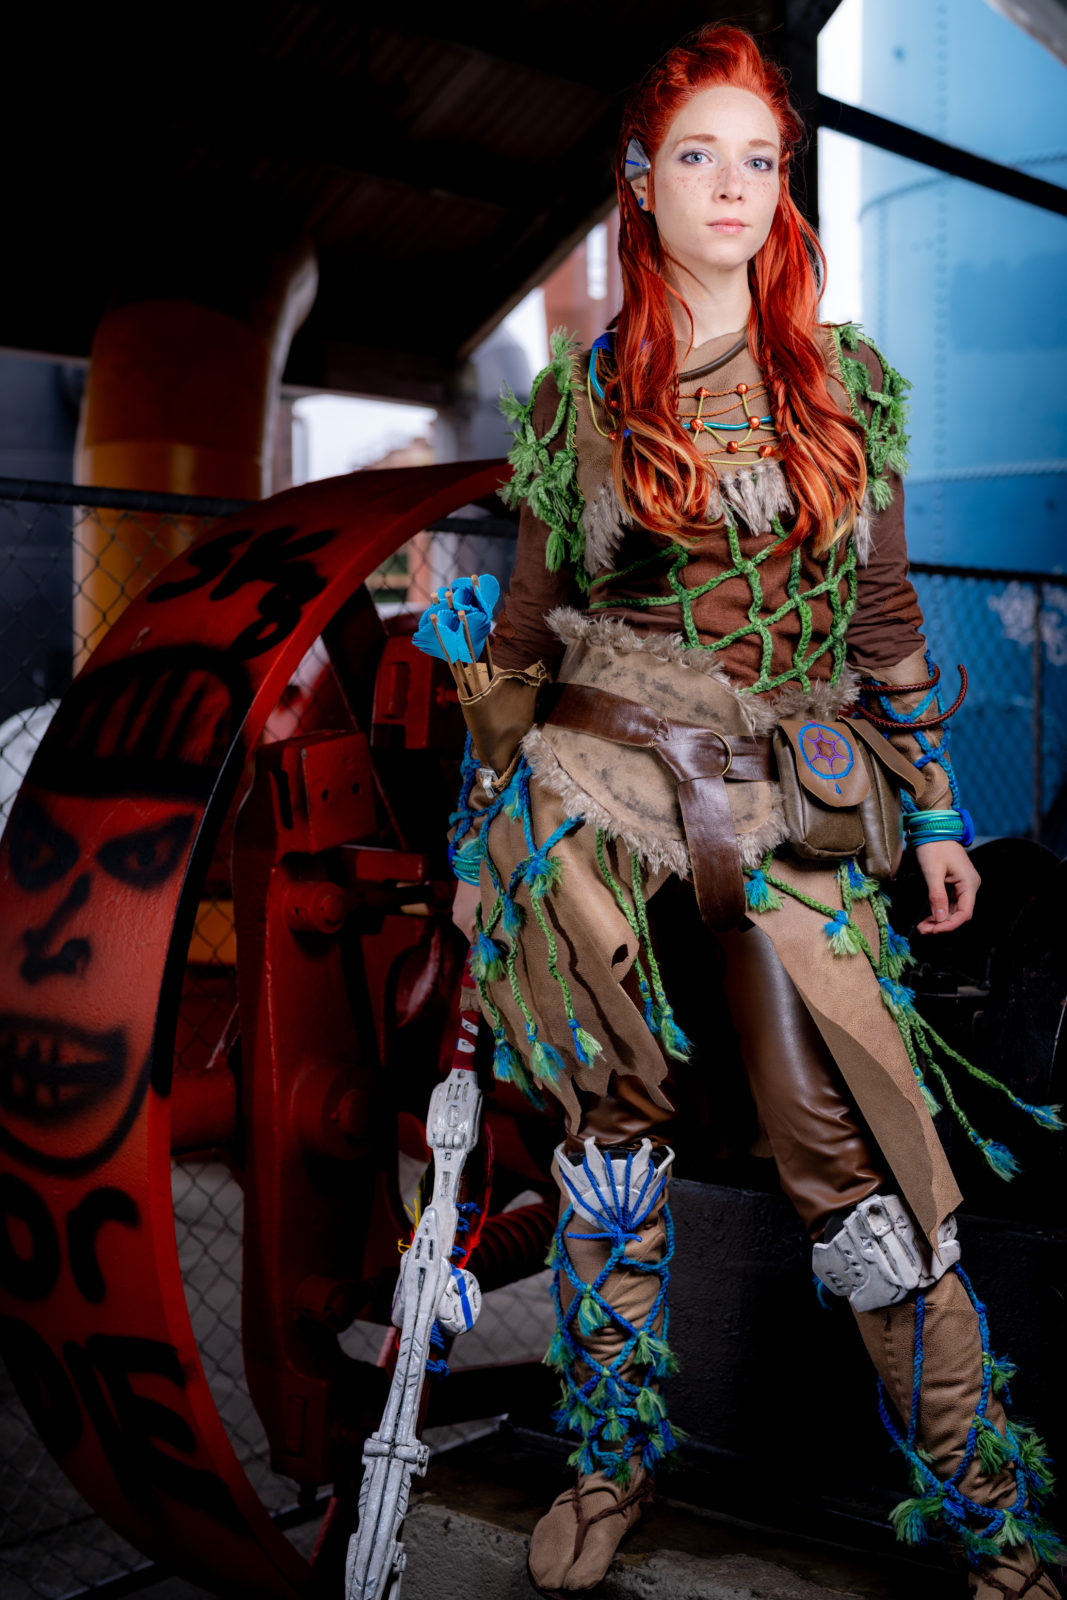
As a stealth and spear sort of player (I really like the knockdown and critical strike combo), I spent most of my time in the Nora Silent Hunter Armor, so I completely ignored the results of my twitter poll and decided to make the ‘medium’ version of the armor for PAX 2019. While, like most video game outfits Aloy’s armor does suffer from some “that’s not how this material would work” and “how the heck did she put that on”, it’s one of the least egregious costumes I’ve made in a while, plus the final build was actually pretty comfortable and mobile!
Adam Koebel took wonderful photos of Aloy, we went to Gasworks Park in Seattle and had fun climbing around on the various bits of machinery. He even managed to pull off the heart pose from photo mode. Be sure to check out more of his work!
This cosplay and tutorial was made possible by my generous Patrons, head over to Patreon to check out the full set of photos, exclusive wallpapers and many other rewards.

For a visual walkthrough of how I made my Aloy Silent Hunter cosplay, check out my videos:
Purchase the pattern for this cosplay in my store!

Getting Started
One of the biggest challenges in this cosplay was findings materials for all the various little textures and accessories in the cosplay; the necklace and bracelets were particularly tricky. In this write up, where possible, I link directly to whatever I purchased, but as many of the materials came from various Etsy stores, I have no idea how long they will continue to remain available.
Overall I aimed for materials that gave the same feel, matching as close as possible in color, size, and texture; but in many places I definitely had to make compromises. In the end when making a cosplay like this, I always suggest aiming for internal consistency over complete accuracy, having materials that go together even if not 100% to the references will always look better.
Photo mode in the game is a great starting place to collect reference images, you can take shots from different directions, poses and even different lighting. There is also a great official cosplay guide, while best for the base costume it does give details on accessories, makeup and props.
Underlayers
Shirt
For the shirt I started with a base plain brown t-shirt, the neckline was cut away so it wouldn’t be seen under the over-shirt. I then added the brown contrast color on the body using a linen blend fabric, I hand stitched the contrast down as I wanted to keep a more rustic look, I also kept the stitching a little more spaced out along the top edge, and left the bottom edge unsitched in order to keep more of the stretch. Similarly, I hand stitched the diamond patches at the elbow.
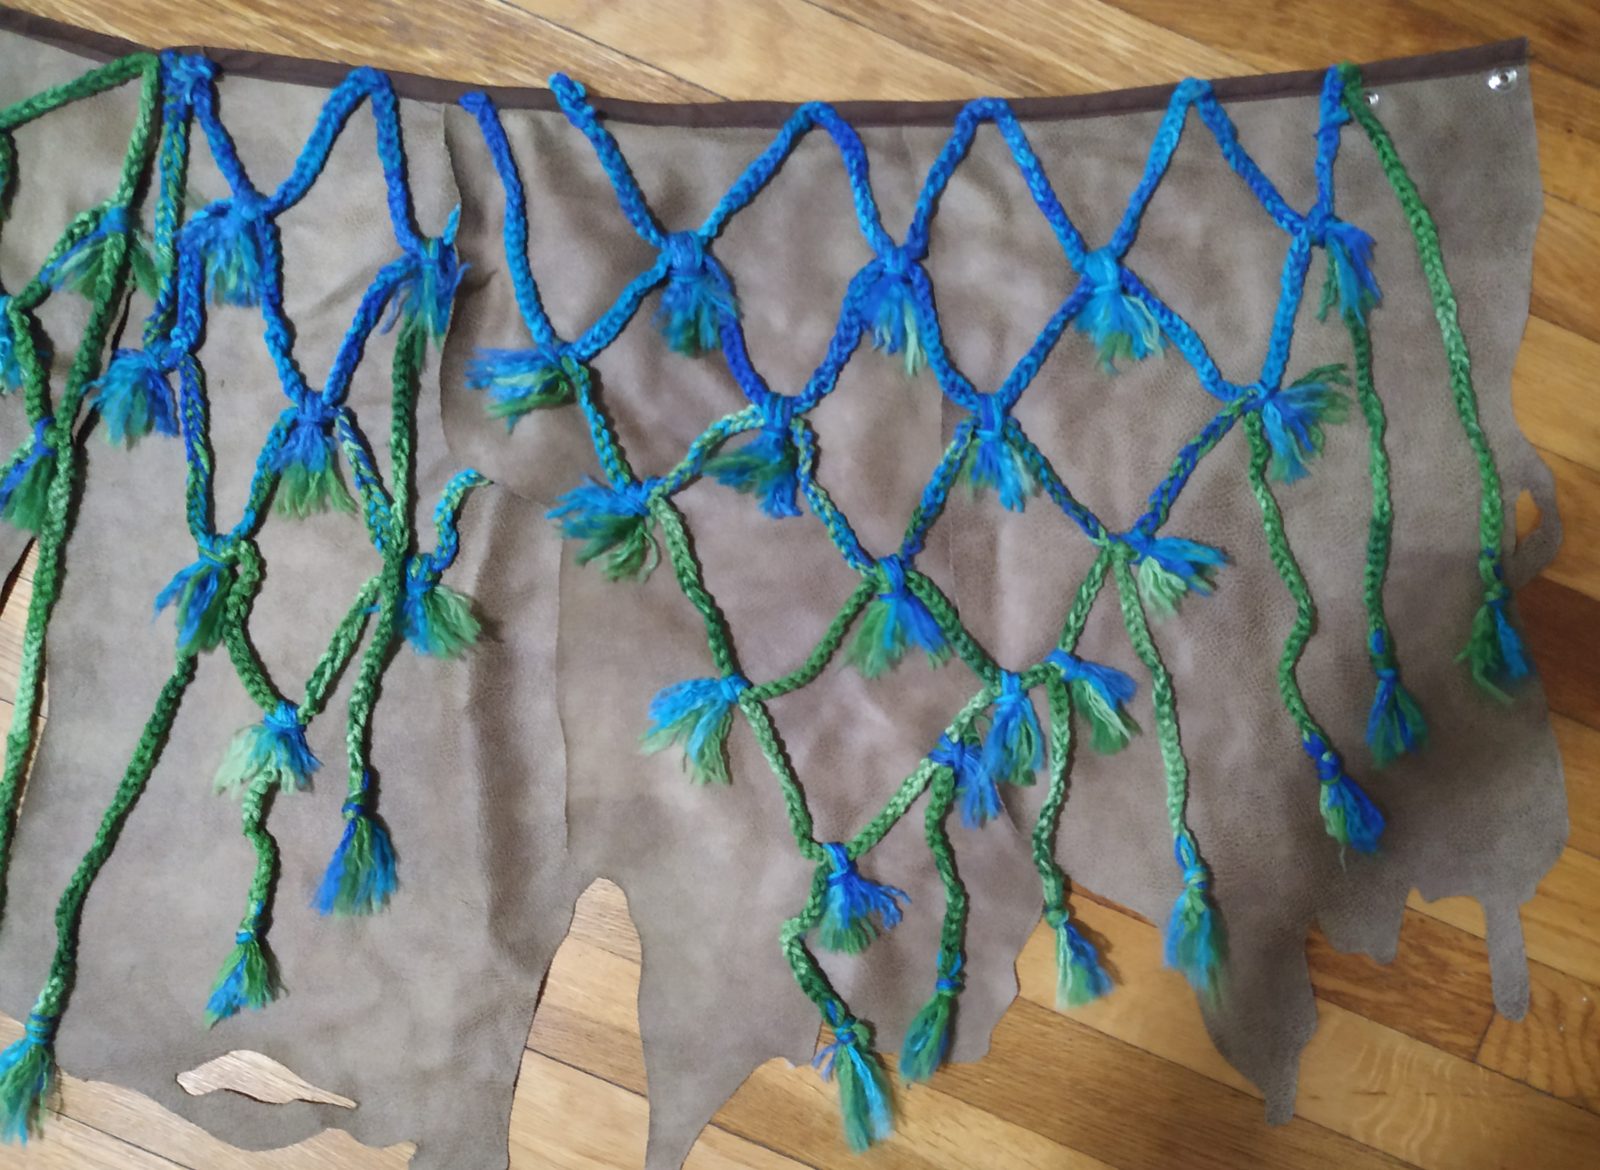
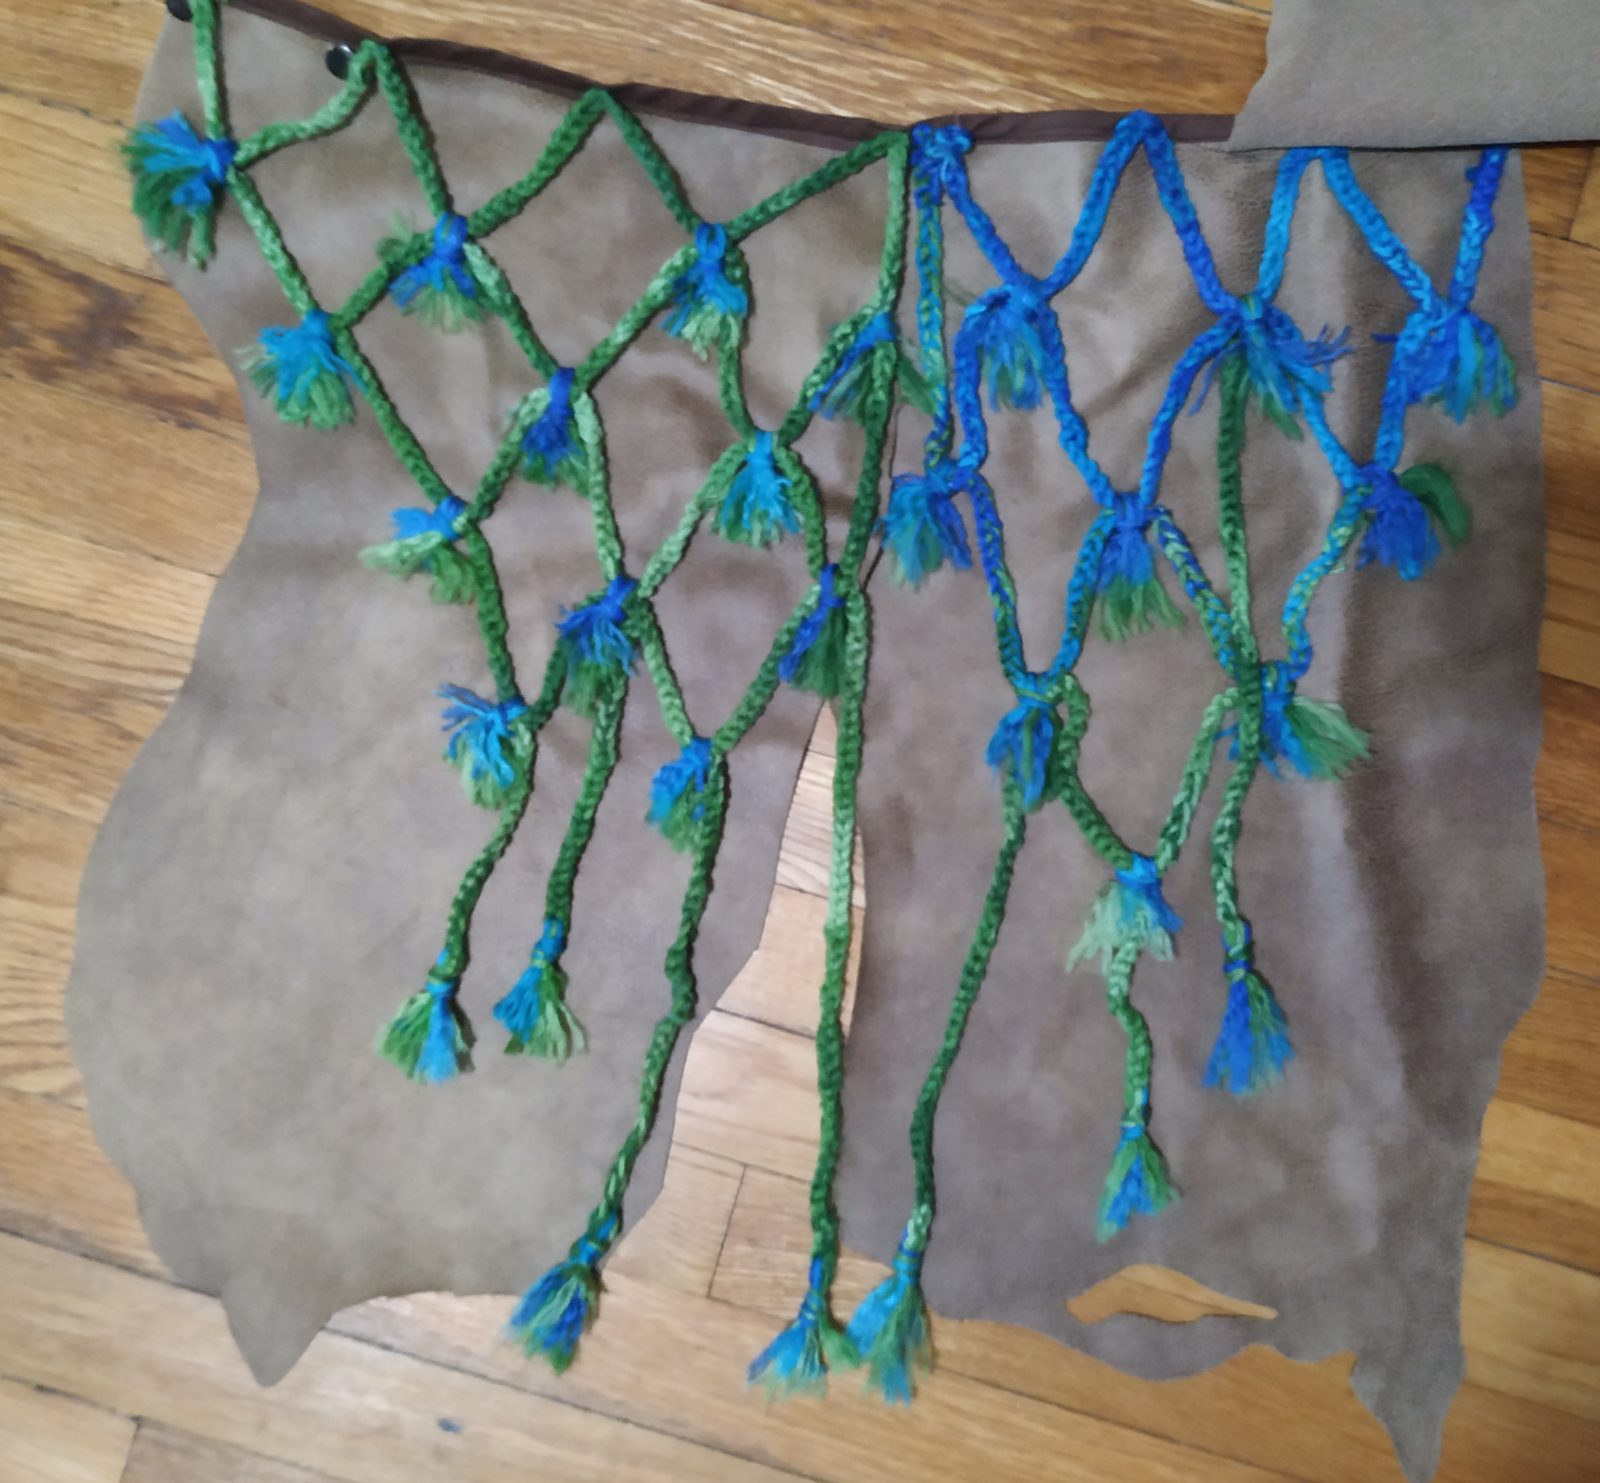
The netting was made by using two strands of green yarn (Green Tones) and creating a very long chain of single crochet. I then made the criss-cross pattern, marking it out first with string to figure out how long each section would be. I then knotted the ‘rope’ into the diamond pattern at the intersections, and stitched it in place so it didn’t shift while I was wearing it. There is a template for the the patterning of the yarn as part of the Aloy pattern.


Pants
To save a little time I purchased a pair of brown pleather pants, be aware that pleather is very warm and sweaty in the summer so you might want to consider an alternative depending on the time of year you are wearing the cosplay. On the flip side I really appreciated the fuzzy lining during the chilly photo shoot.
I made a few modifications to the pants to make them fit my hips better, and added a gusset in the crotch for more range of motion. You certainly could make them from scratch or modify a purchased pair to add the extra seam lines that you can see in the references.
Over-shirt
The base material for the over-shirt was a pleather I found at Jo Ann in the sale section, you could certainly use a soft leather if you want to spend a little more money. This pleather had a pretty soft hand, meaning it draped relatively well, giving it a light weight leather sort of feel. The most important thing to look for when finding pleather for this costume is pleather that isn’t fabric backed, which will make it look much more natural and save you from having to line the material. Upholstery sections are going to be a great place to look!
The shirt is a short crop top, the pattern for which is included in my Aloy pattern, with a large scalloped edge. I used some thin hemp cord, the sort used for jewelry making, to add some decorative stitches around the armhole and the shoulder. I punched holes in the bottom edge, and looped through grey/brown yarn (Grand Canyon) that I then frayed to make the tassels. The sleeve netting was made in the same way as the other netting, though rather than knotting the yarn, I used another strand of yarn to loop them together which then became part of the tassel at each of the intersections.
Necklace
The necklace was an interesting challenge of finding materials:
- 4mm light brown bolo cord
- 10mm brown rubber cord
- 3mm Light green silicon tubing
- Blue/Teal Iridescent cording
After determining the layout, I arranged most of the strand loops together and hid the join underneath the blue fabric section at the side, which was a scrap of royal blue matte satin I had lying around. The green “net” section was made from sections of the tubing threaded over fishing wire. I then covered these joints in balls made from worbla, which I painted copper.


Skirt
The skirt was made from the same pleather as the over-shirt, I cut out four sections, matching the design from the references as much as I could. The panels are then arranged, front left over back left, back left under back right, and back right under front right (see image). I stitched them to a piece of bias tape to form the waist band and added two heavy duty snaps at the waist (front left over front right) to close.
For the skirt netting I also used blue yarn (Macaw) to create the green blue fade, transition from green only, to blue green mix, to blue only when creating the crochet strands. I also used a blue green mix when creating the tassel at the intersections. A template for the color and layout of the netting is part of the pattern. I stitched the netting down in several places to keep it secure and prevent it from moving independently to the skirt, so it would retain it’s diamond like shape at all times.
Under-belt and Accessories
Under-Belt
I went through a few different iterations of the under-belt, before I settled on the final concept. The fur trim was made of yarn loops around a strand of grey/brown yarn (same as on the over-shirt), that were then frayed to give the fluffy texture. The belt is made of a base piece of faux suede which I stitched the fur trim to, I then glued another layer of the the suede over the top of this, hiding the stitching. I then added two snaps to close, which are hidden under the ring belt, as well as some weathering with watered down acrylic to give the suede less of a uniform texture.
If I were to make the under-belt again, I would likely use a different kind of fur trim, ideally a sheepskin or sheep skin like fabric so it already had fur attached to the outer material. I would also use something other than the suede which was a little too thin, and lacked much of the leathery sort of texture I ideally wanted.


Belt
The belt was made from a strip of pleather, one end folded over a 2 inch ring, and then stitched down to create a simple ring belt. I would actually suggest getting real leather for this section, just to increase the strength, meaning you can put more things in your pouches!
The decorative belt (or whatever you want to call it), was made from brown 10mm climbing cord, I sewed a small tab to each end, with a snap on it, and then hid the snap underneath the blue fabric loop.
Pouches (and Rope)
The pouches are made from two different colors of pleather (again acquired from Jo Ann in the sale section). The pouches are made in 3 parts, a front section, a strip that attaches to the sides and bottom of the front section, and then a back section which is slightly longer than the front so that it can fold over. Each of the pouches also has a loop sewn onto the back to thread them onto the belt, I would suggest doing this before you attach the back to the the front! The design on the smaller pouch was done using a zig-zag stitch on my sewing machine with the shortest stitch length.
I used snaps to keep the pouches closed. I stitched a snap to the front section, and to make sure I didn’t have stitch marks on the flap I sewed the other snap to a piece of fabric and then glued it to the inside of the front flap. To help the pouches keep their shape a little better I cut very small slits around the opening of the pouch and threaded a thin piece of elastic through, this allowed me to easily reach into the pouches but kept them more securely closed.
For the rope I picked up 15 ft of 3/8in cotton rope, and then stained it a little darker using a tea dye bath. I looped the rope several times and tied it at the top to then slide it one the belt.
Quiver
The quiver is made from a piece of pleather folded over, for this I again used a pleather that was not fabric backed as the inside would still be somewhat visible. I stitched the edges of the quiver together using the thin hemp cording, being sure to leave the top open but still have the decorative stitching.
The ‘metal’ pieces were made from EVA foam covered in worbla and then painted and weather before being glued on with E6000. I used two strands of a braided leather trim for the decoration, glued directly to the pleather (with a loop left unglued in the back for the belt). The metal ring was a 2 inch metal o-ring, same as I used for the belt.
The arrows were made from wooden dowels with the fletching made from blue 2mm EVA fraft foam.


Legs
Greaves
I used the same pleather as the skirt and over-shirt, the basic pattern is a rectangle that wraps around my leg and stitches closed on the inside of my calf. I added a dart down the center back and the inside edge in order to have the shape conform a little more to my calf. The whole thing was stitched together into a tube, leaving a portion unstiched at the top and bottom, which were then closed with snaps so that I was able to get them on and off. I kept the edges raw and uneven to give them more of the natural and handmade look.
Like the rest of the cosplay the Aloy pattern includes templates and guidelines for assembling. The netting was done in the same way as the rest of the costume, using only the blue yarn, with a small amount of green added to the tassels. The left greave also has a loop of 10mm green/teal climbing cord stitched around the top of the calf, the opening is hidden under the knee armor.
Knee Armor
The knee armor was made from layers of EVA foam, then covered in worbla and painted to look like machine parts – a white base, lots of grey and brown weathering and some silver on the edges. Both knee pieces have a loop of elastic on the back, covered in pleather to hide the elastic, and slip on over my leg, sitting right around the knee so they stay in place.
Shoes
I made little booties, based on moccasin boot patterns, essentially tracing around my foot, and creating a sock out of pleather. I then glued this directly to the sole of a brown flip flop using E6000. I used some braided bias tape to make the strap that goes around the top of the foot, running loops of bias tape through the holes in the flip flop to run the strap through. I added some bits of rubber on the bottom to seal in the bias tape loops.


Arms
The bracers were made from the same pleather as the greaves/skirt etc… Like the greaves they are essentially tubes, stitched closed on the inside of the arm, I left a section unstiched at the wrist and added a snap to close so I would be able to slip them on and off. The netting was made from the blue yarn, with blue yarn for the tassels.
The left bracer has a loop of 8mm leather bolo cord around the forearm, with a small piece of blue fabric covering on end. The right bracer has a piece of armor made from EVA foam covered in worbla and painted in the same way as the knee armor, this is glued directly to the bracer. There is also a loop of brown 10mm climbing cord, with 8 small gold colored rings, this is stitched directly to the bracer.
As I struggled to find an exact color and texture match, I improvised a little on the bracelets. I used teal/green climbing cord with copper tube spacers, 4mm seafoam and 3mm turquoise silicon tubing, hiding the joining ends with the blue fabric.


Wig and Bits
The base wig was a long lace front red wig, I got one with a slight curl to match Aloy’s texture. In order to create the variegated color, I ombre dyed a set of butterscotch blonde wefts from Epic Cosplay Wigs to a redder brown color using RIT Dyemore, leaving the tips blonde. I then sewed these wefts into the main wig. I followed a few different tutorials on styling the wig ( Silvousplaits | Lightning Cosplay | Zonbi’s Workshop), with a lot of hair spray and some general fudging I got something pretty close to her look. I used Pros Aide to keep the hairline of the wig down.
Make-up wise, I kept it pretty simple, mostly adding some fake freckles using a stipple brush and brown Ben Nye creme make-up, with a few larger ones added with the base of the make-up brush (you can see a similar look in my Evie Frye make-up).
The Focus was made from EVA foam covered in worbla, I started with a 5mm piece of foam and beveled the edges with a Dremmel to get the desired shape. To stick it on, I attached a magnet to one corner of the focus and then then held it in place with another magnet on the underside of the wig, right above my ear.


Spear
I used Kamui Cosplay’s EVA foam spear build video as my main guide for making the spear, as well as her spear blueprint (buy her books).
For materials I started with a 1in (internal diameter) PVC pipe, heat formed into shape and wrapped with 2mm EVA foam. The “metal” parts were made from layers of EVA foam (mostly 5mm, and some 2mm), which I then wrapped in worbla, I made it in various sections using the sticky properties of the worbla to stick it all together.
After I painted the white sections the same as the knee armor, using a base of white spray paint, lots of weathering with watered down black acrylic and some silver rub n buff. Lastly a few detail bits were added with blue acrylic. The decorations were done with bits of red fabric, feathers some woven pleather, more silicon tubing, and red para cord.