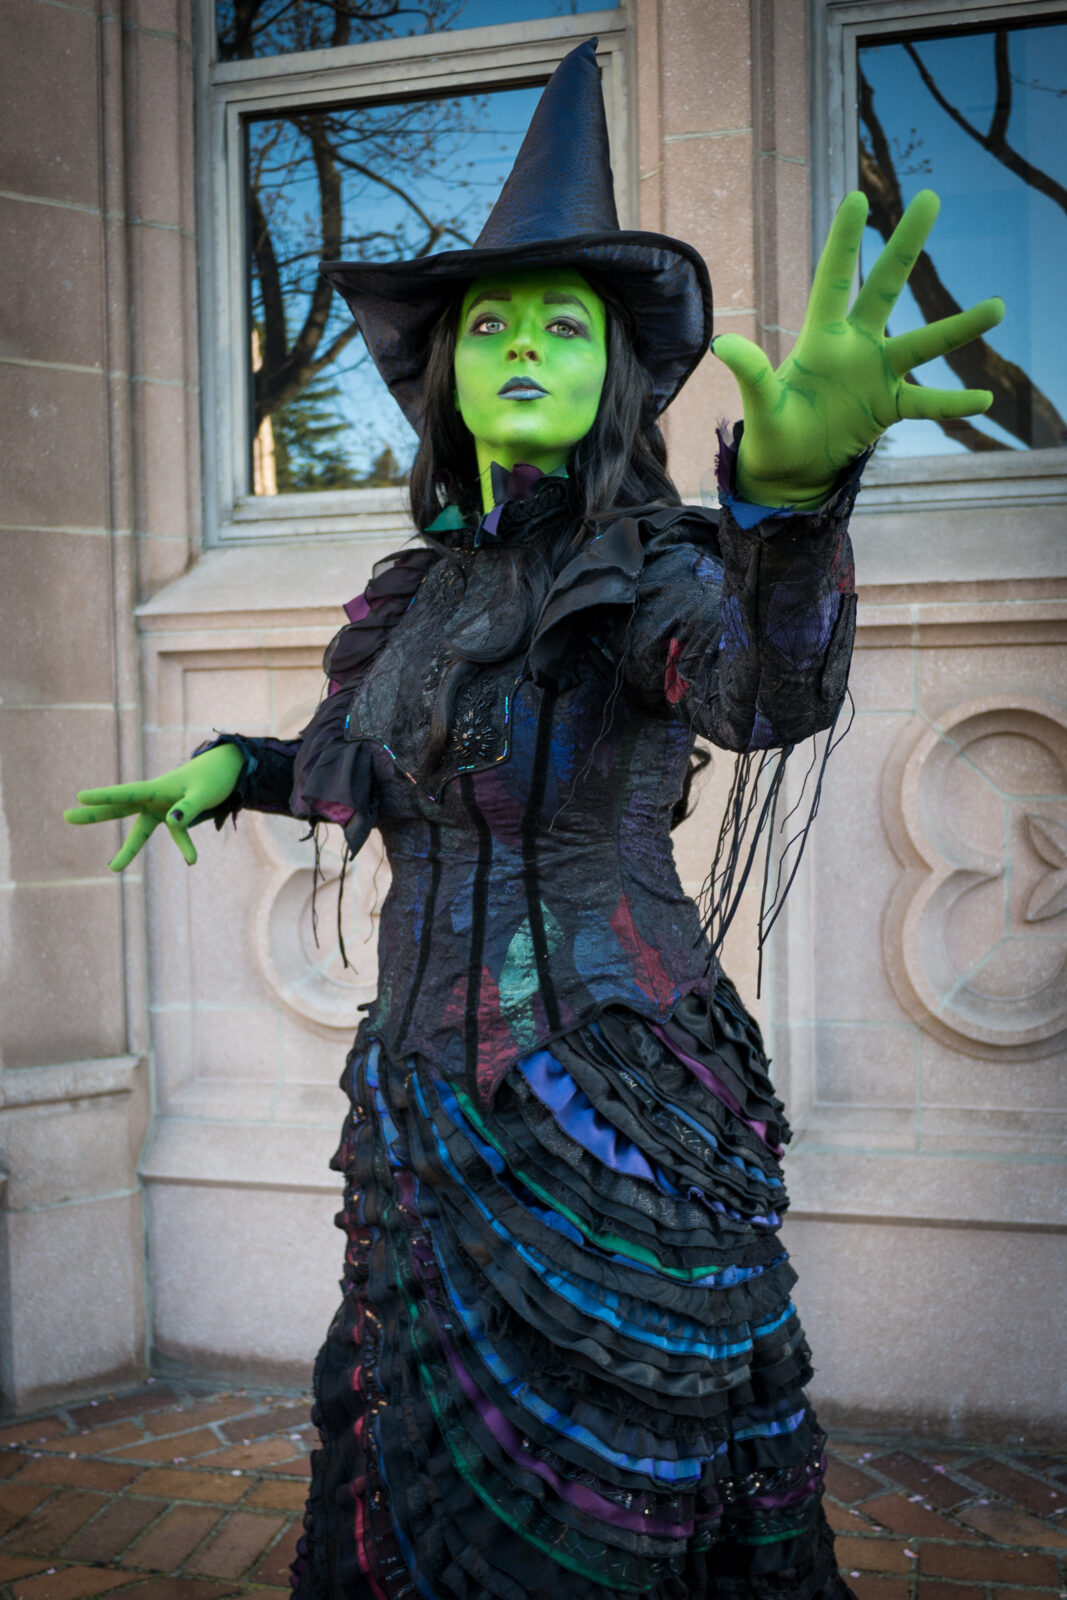
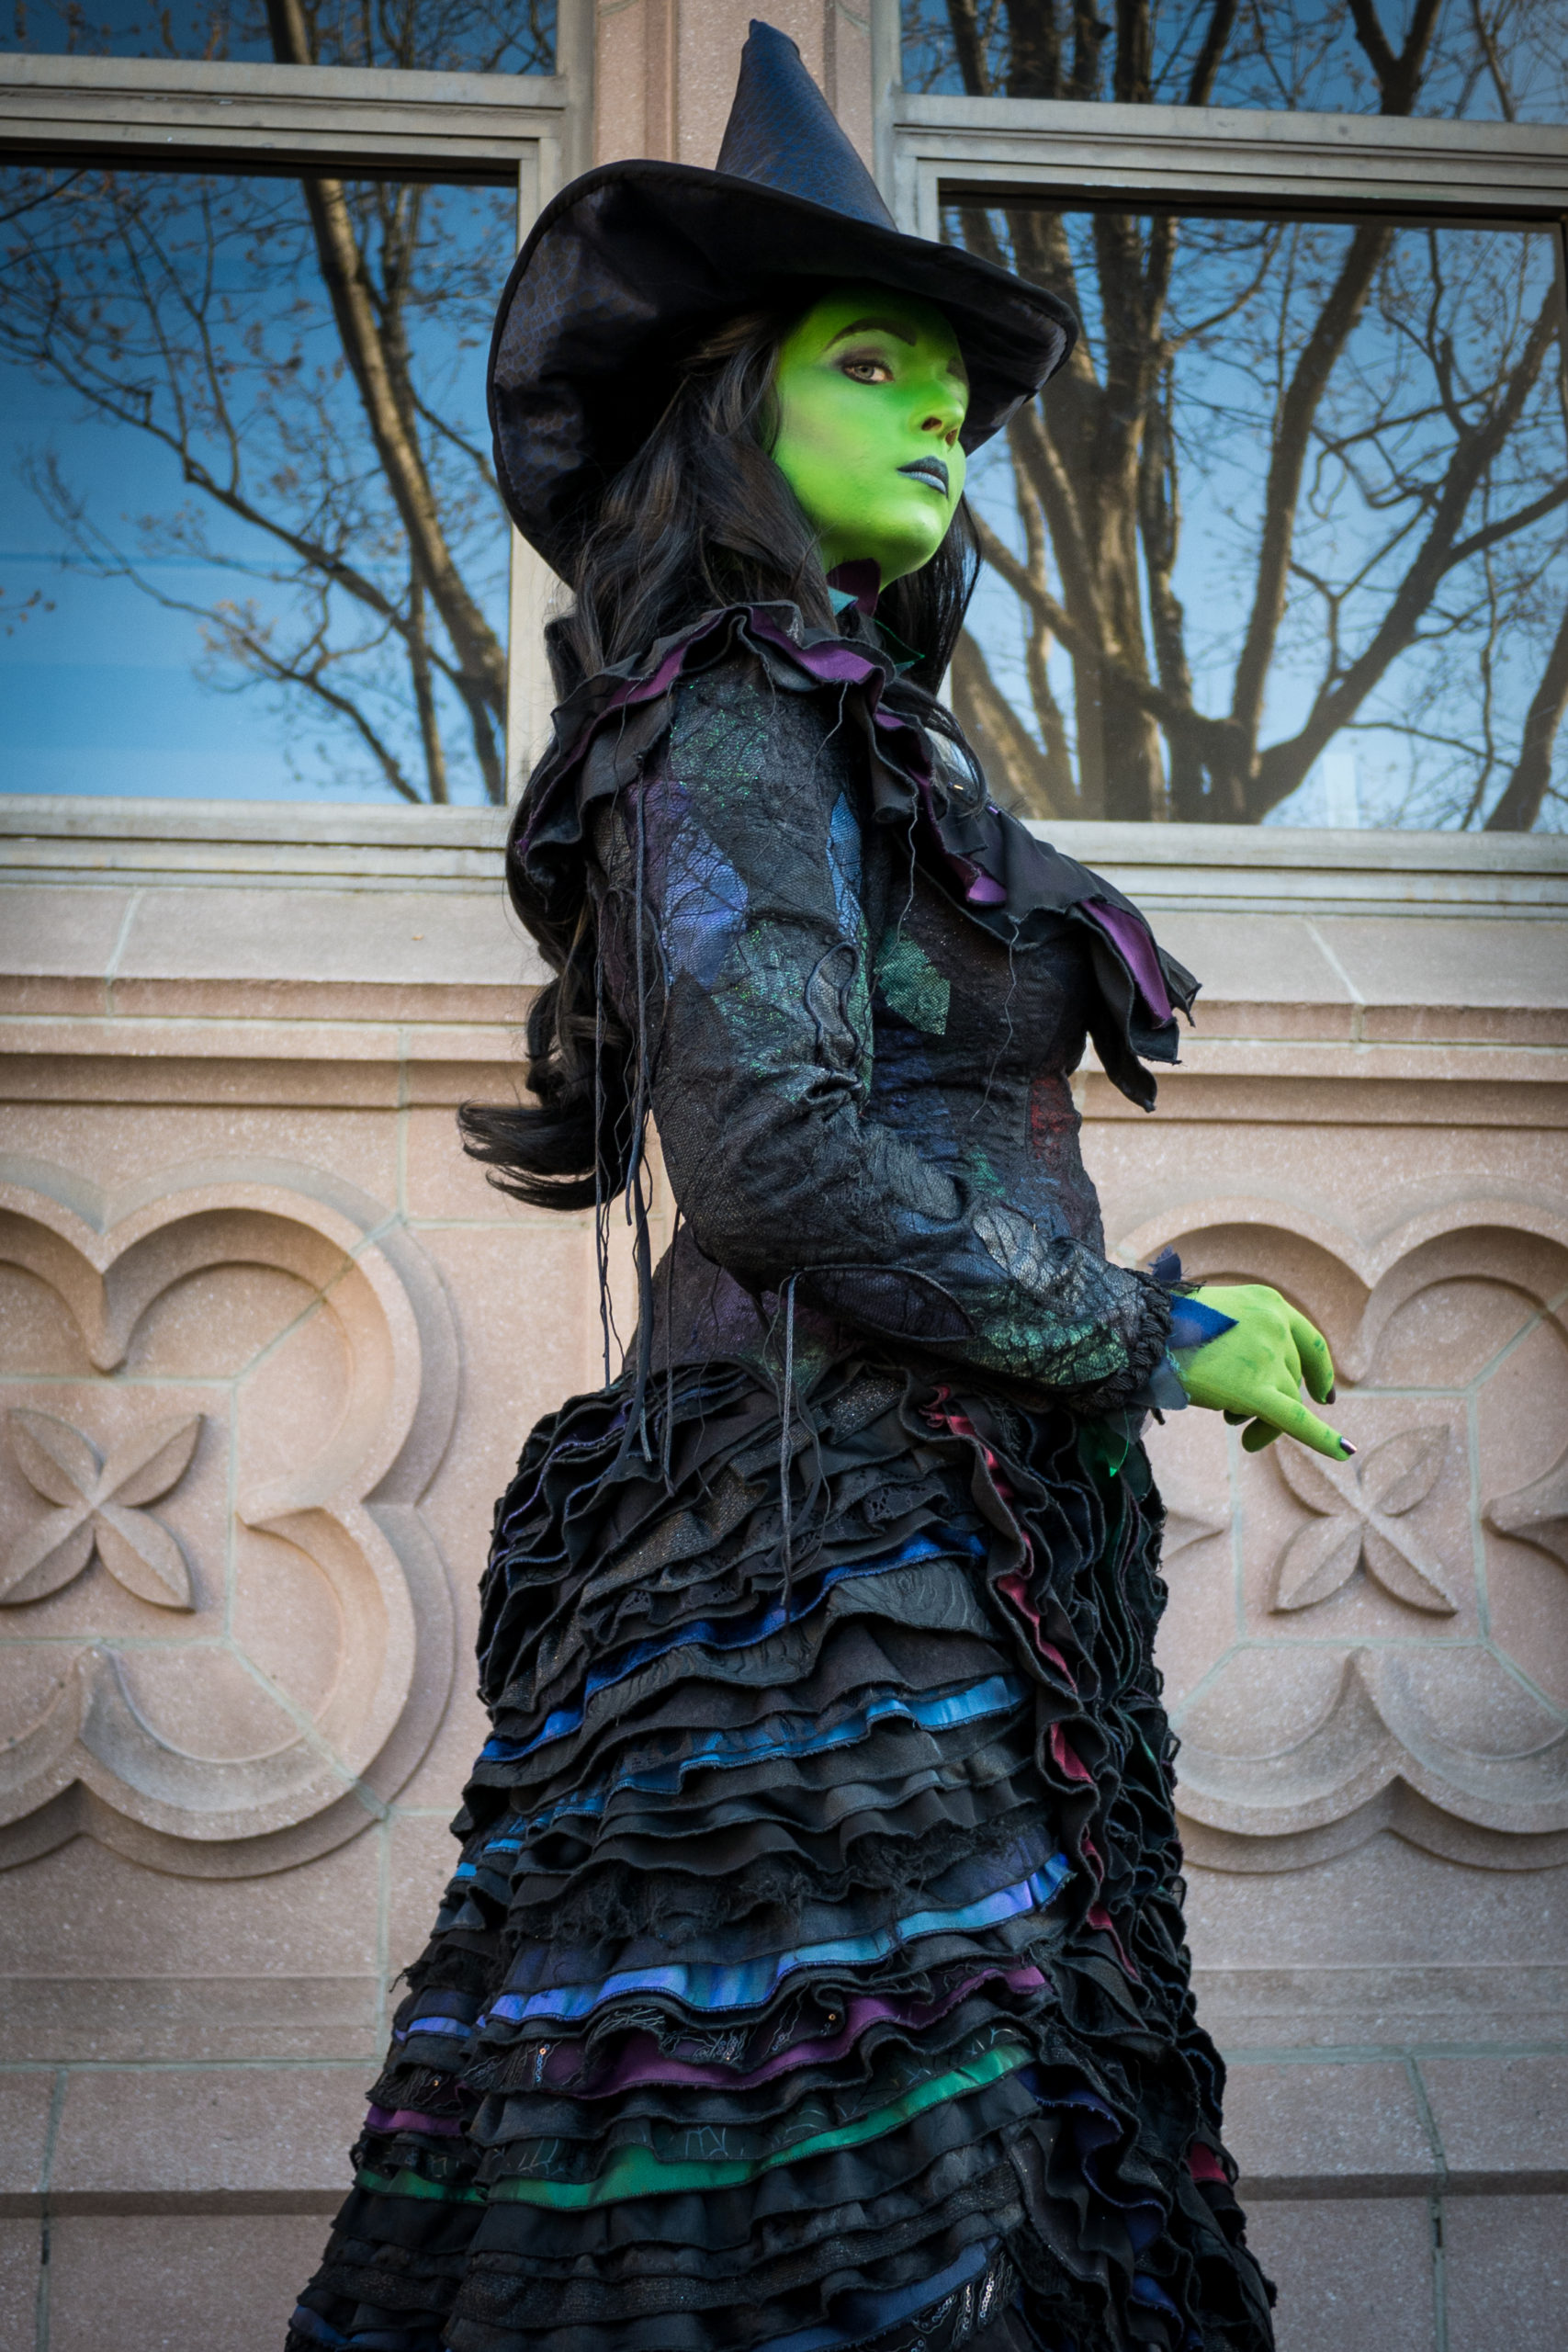
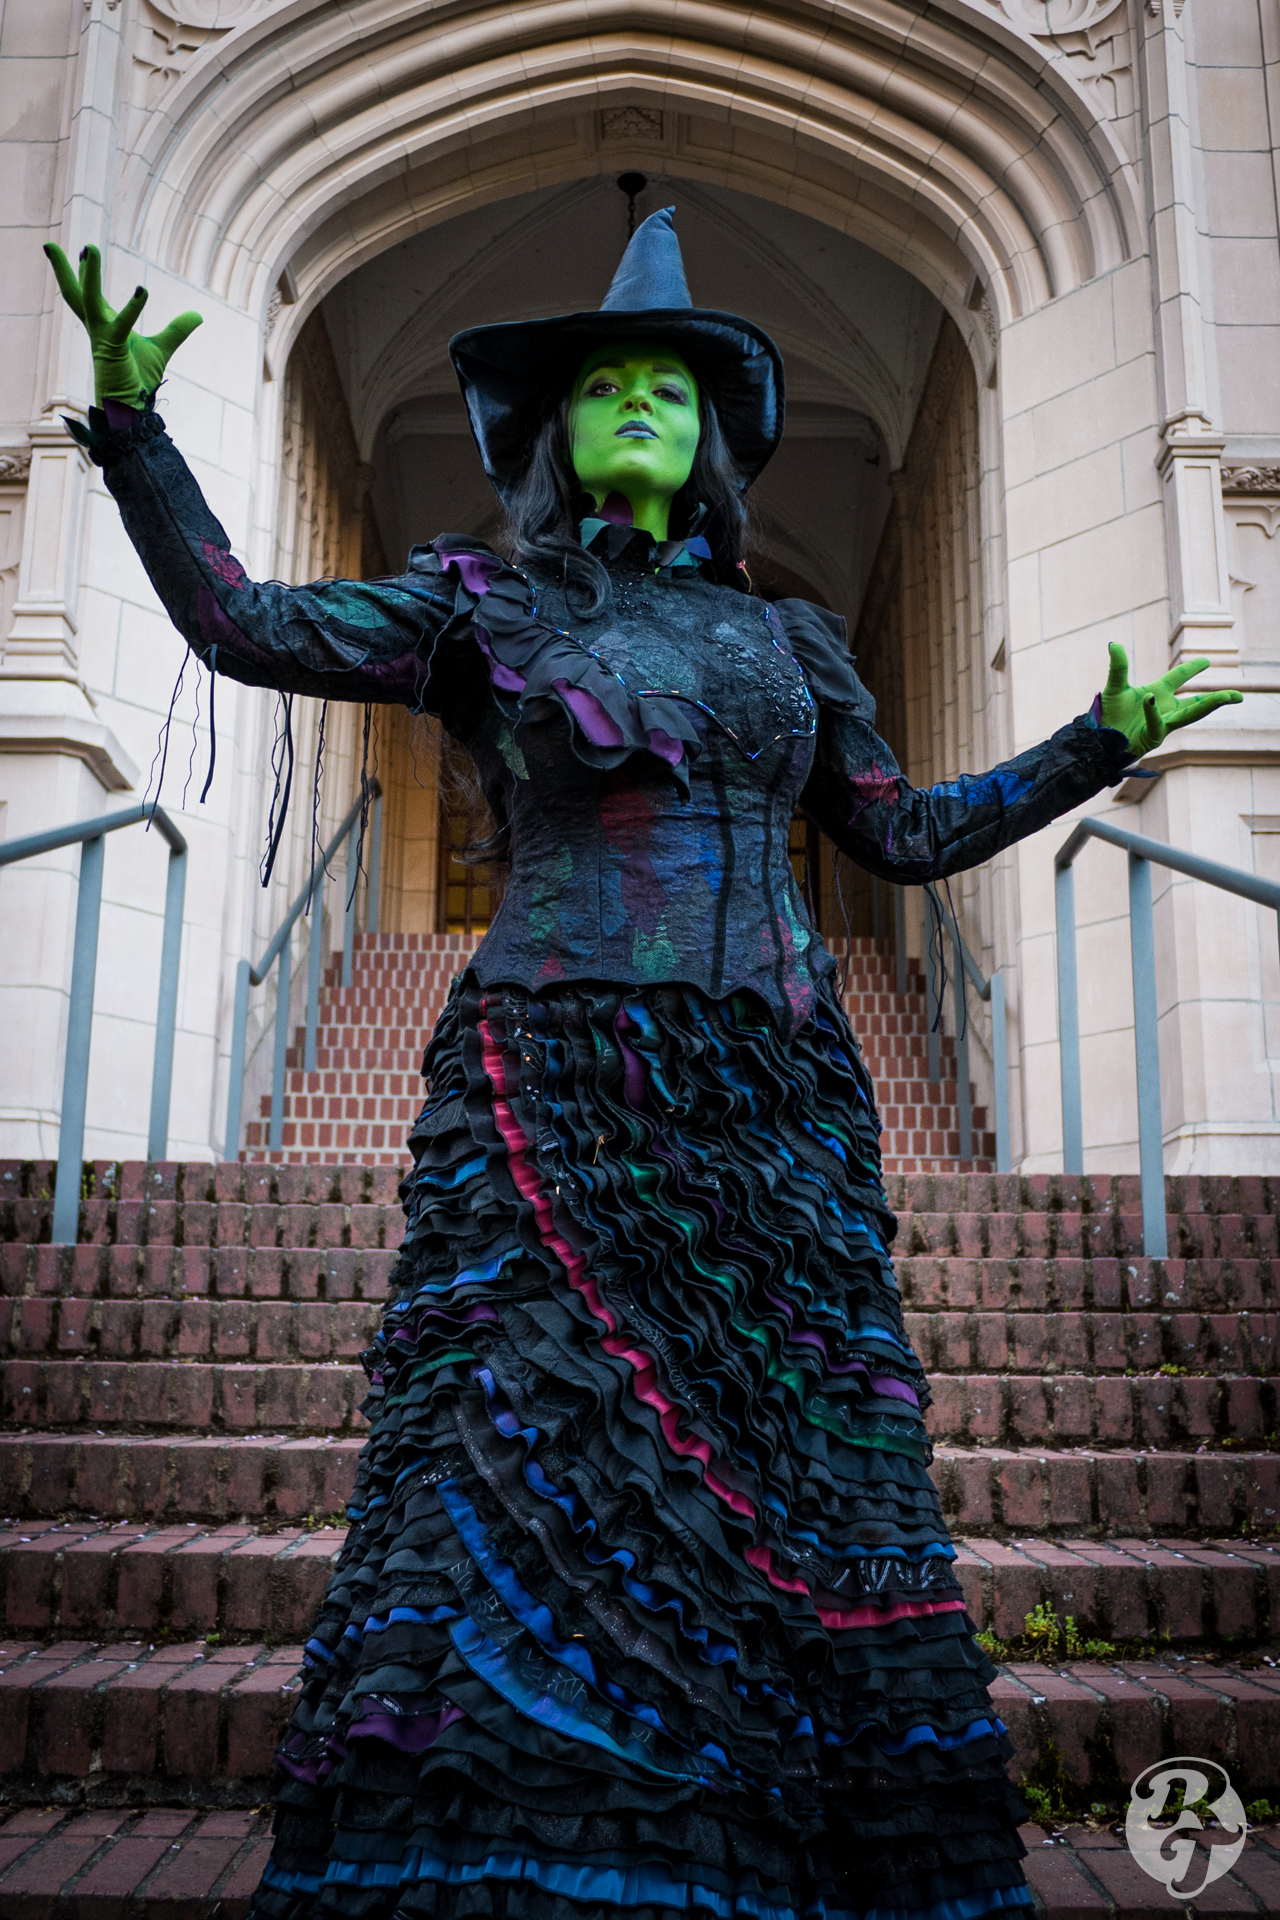
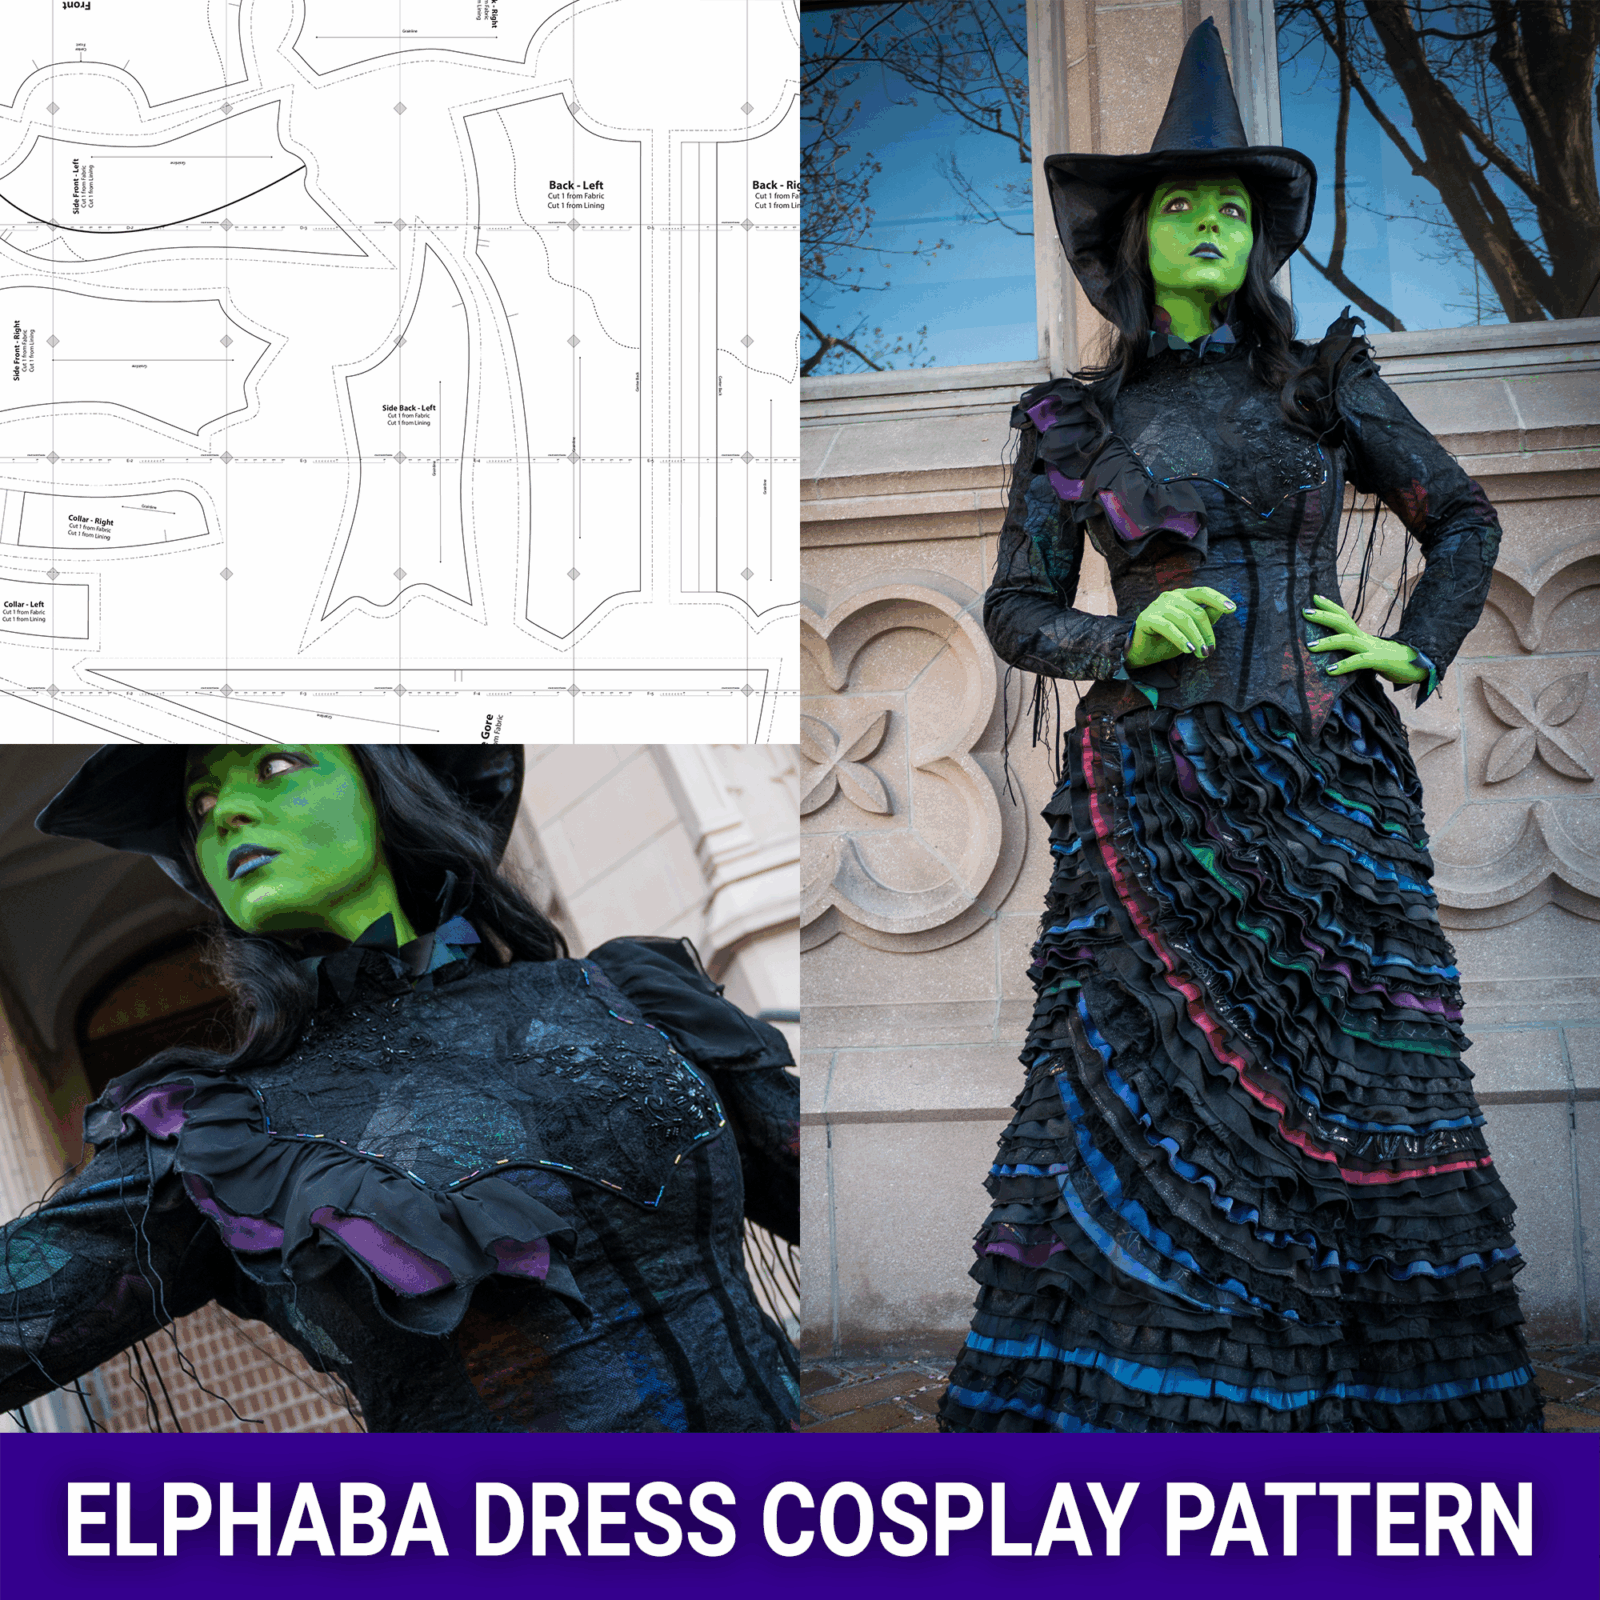
Wicked remains one of my favorite musicals, as a certified theater kid recreating this iconic design has been on my list for a long time. Bringing the dress to life was a unique challenge, stretching both my sewing and my design skills, and I am so proud of how it all came together – while I never ended up becoming a costume designer, this project was still a little nostalgic to my theater days. Often with cosplay I focus more on the visual than the durability, but for this build I wanted to really take inspiration and make it as close as I could to stage production ready!
If you’re looking to make your own version of this dress you can check out my pattern:
You can also check out my video version of this build guide:
Reference Images
To start I needed to gather references, which is a little bit of a challenge when you’re referencing an outfit from a live theater show as there was no direct way to gather images myself. There are thankfully some great reference images available online, the core ones I used:
Because every time there is a new performer in the role they need to make a new version of the dress, there are slight differences in the exact design of each dress: primarily in the materials that are used. This was often both a blessing and a curse, as I could make slightly different choices to make my own version of the costume while still feeling true to the original, but at the same time I had a lot more decisions to make without having a singular version to base them off.
Materials
The first major challenge of the costume was finding the fabrics. Looking at the reference images it’s clear that the original design uses a huge variety of fabrics, but none of them in particularly large quantities. This meant it was going to be preferable to source fabrics locally as much as possible so I could buy quantities in less than a yard, which is normally the minimum order online.
Unfortunately Seattle has a limited supply of fabric stores compared to somewhere like New York or London where this costume would have been made originally. I was also able to do some stash busting, because apparently I had lots of random dark colored fabrics. Generally speaking the goal of the materials was variety both in color and in textures – mixture of opaque fabrics like satin and brocades, alongside translucent materials like organza and chiffon. I had a lot of success looking for materials in the Halloween section of Jo Anne (when that existed), which gave me some unique patterns and textures especially for more variation in black fabrics and weird sparkle. Ultimately the fabrics you use will come down to what you have available to you, and the overall ~vibes~ you are going for.
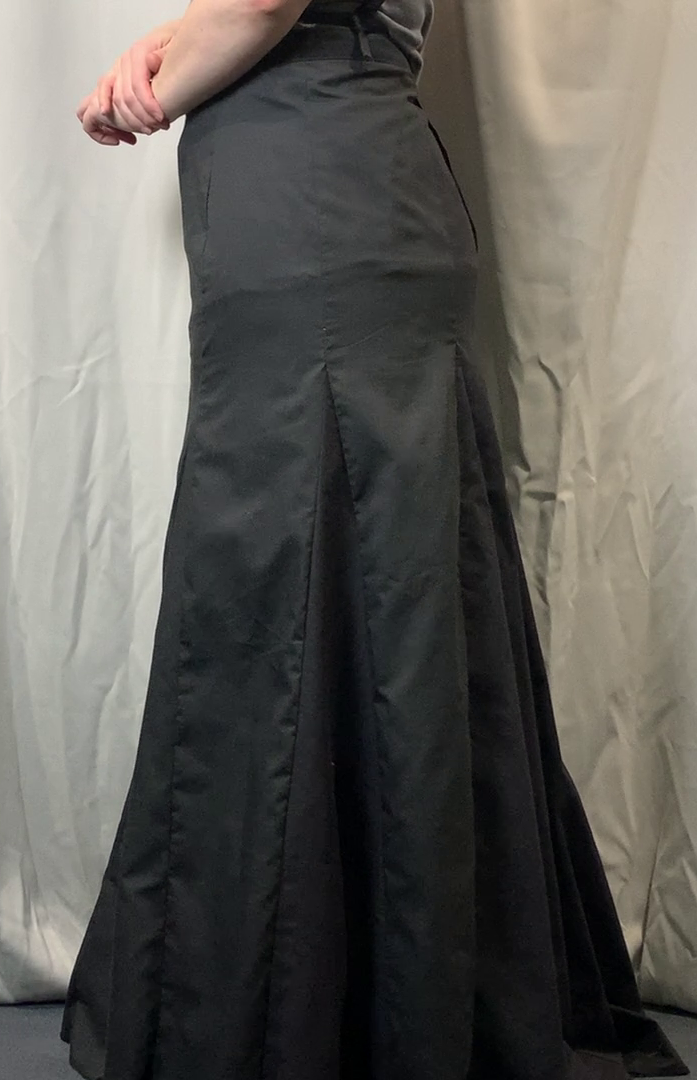
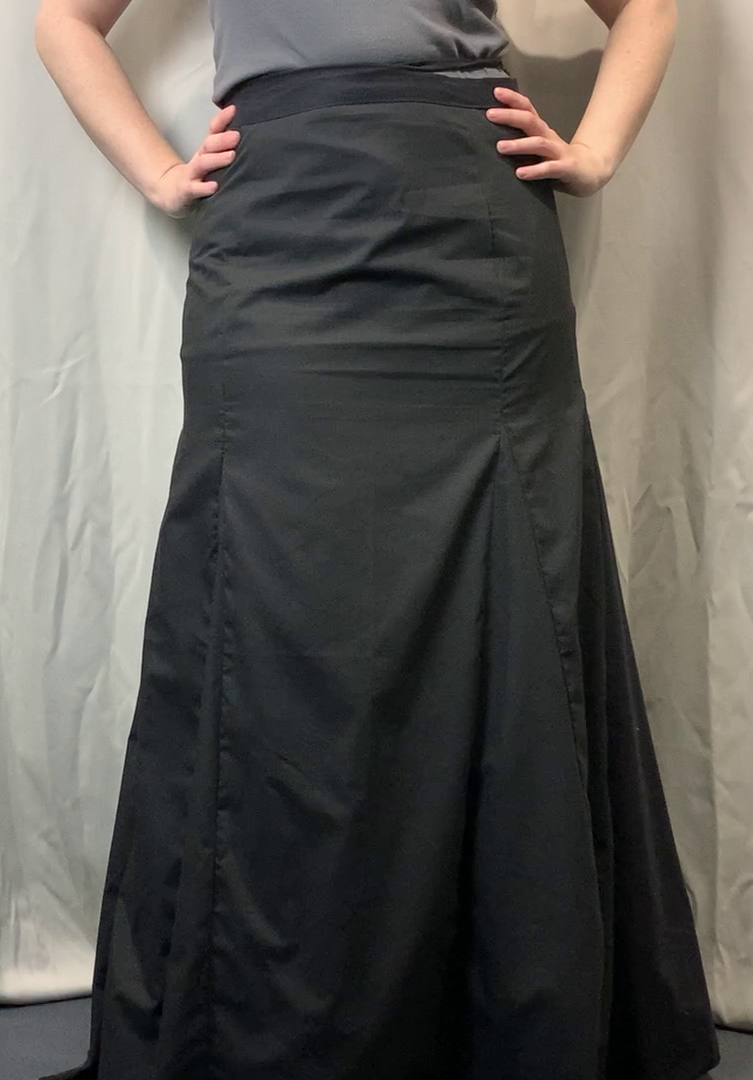
Skirt
I started with the skirt. Well actually I started with the bodice and then quickly realized the skirt shape would affect the bodice shape and quickly swapped over to making the skirt – so I suggest starting with the skirt.
The base of the skirt is a paneled trumpet skirt with gores that fits close around the hips and then flares out above the knee. I used a sturdy black quilting cotton for the under fabric knowing I would be adding a whole bunch of ruffles and it would need to support the weight. It zips closed in the center back and I used twill tape to reinforce the waist band.
The rest of the skirt is just ruffles, so many ruffles, it was more than I originally thought and I originally thought it was a lot! To start I did some very rough napkin math that involved counting the number of rows I could see on the skirt (about 50), and then estimating that each row was around a yard and a half in length and 3 inches in width on average.
Assuming 60in wide fabric I would need about 7 yards of fabric total spread across all the colors. This made about 180yards of fabric strips for 90 yards of ruffles. I mostly purchased 1/3 and 1/2 yard amounts of the fabrics – and did end up with some excess in certain colors. I was also able to use most of the fabrics again for the bodice so some excess wasn’t a bad thing. My fabric purchasing was a pretty iterative process, I would buy a batch of fabrics, add them to the skirt and then go back for more once I had sense of how I wanted to fill things in. I scoured most the fabric stores in the Seattle region multiple times, and I probably managed to purchase every type of black woven fabric in the local area.


In the end I used about 15 different fabrics, roughly half of them were various black fabrics and the other half dark cool colors, such as navy, teal and purple. I also wanted a mix of opaque and translucent fabrics like chiffon and organza, as well as different textures and shine for as much visual variety as possible. I would recommend weighting your choices to the darker cool colors like black, purple and navy, with things like green and teal being more sparse. Variety in your black fabrics is also key as well as using sheer black fabrics to mute the tones of the brighter materials.
The ruffles were constructed in long strips of about 3in wide, I sewed each color into a continuous strip to save some stopping and starting in the middle of the layout process. Some of them I used french seams for (mostly the colored fabric) so it would be neater if it happened to show, while a lot of the all black fabrics I just went ahead and serged them together. I then used my serger and gathered one edge and rolled hem the other. Pro tip – do the rolled hem first then the ruffeling as it is easier to wrestle the unruffled fabric into the serger.

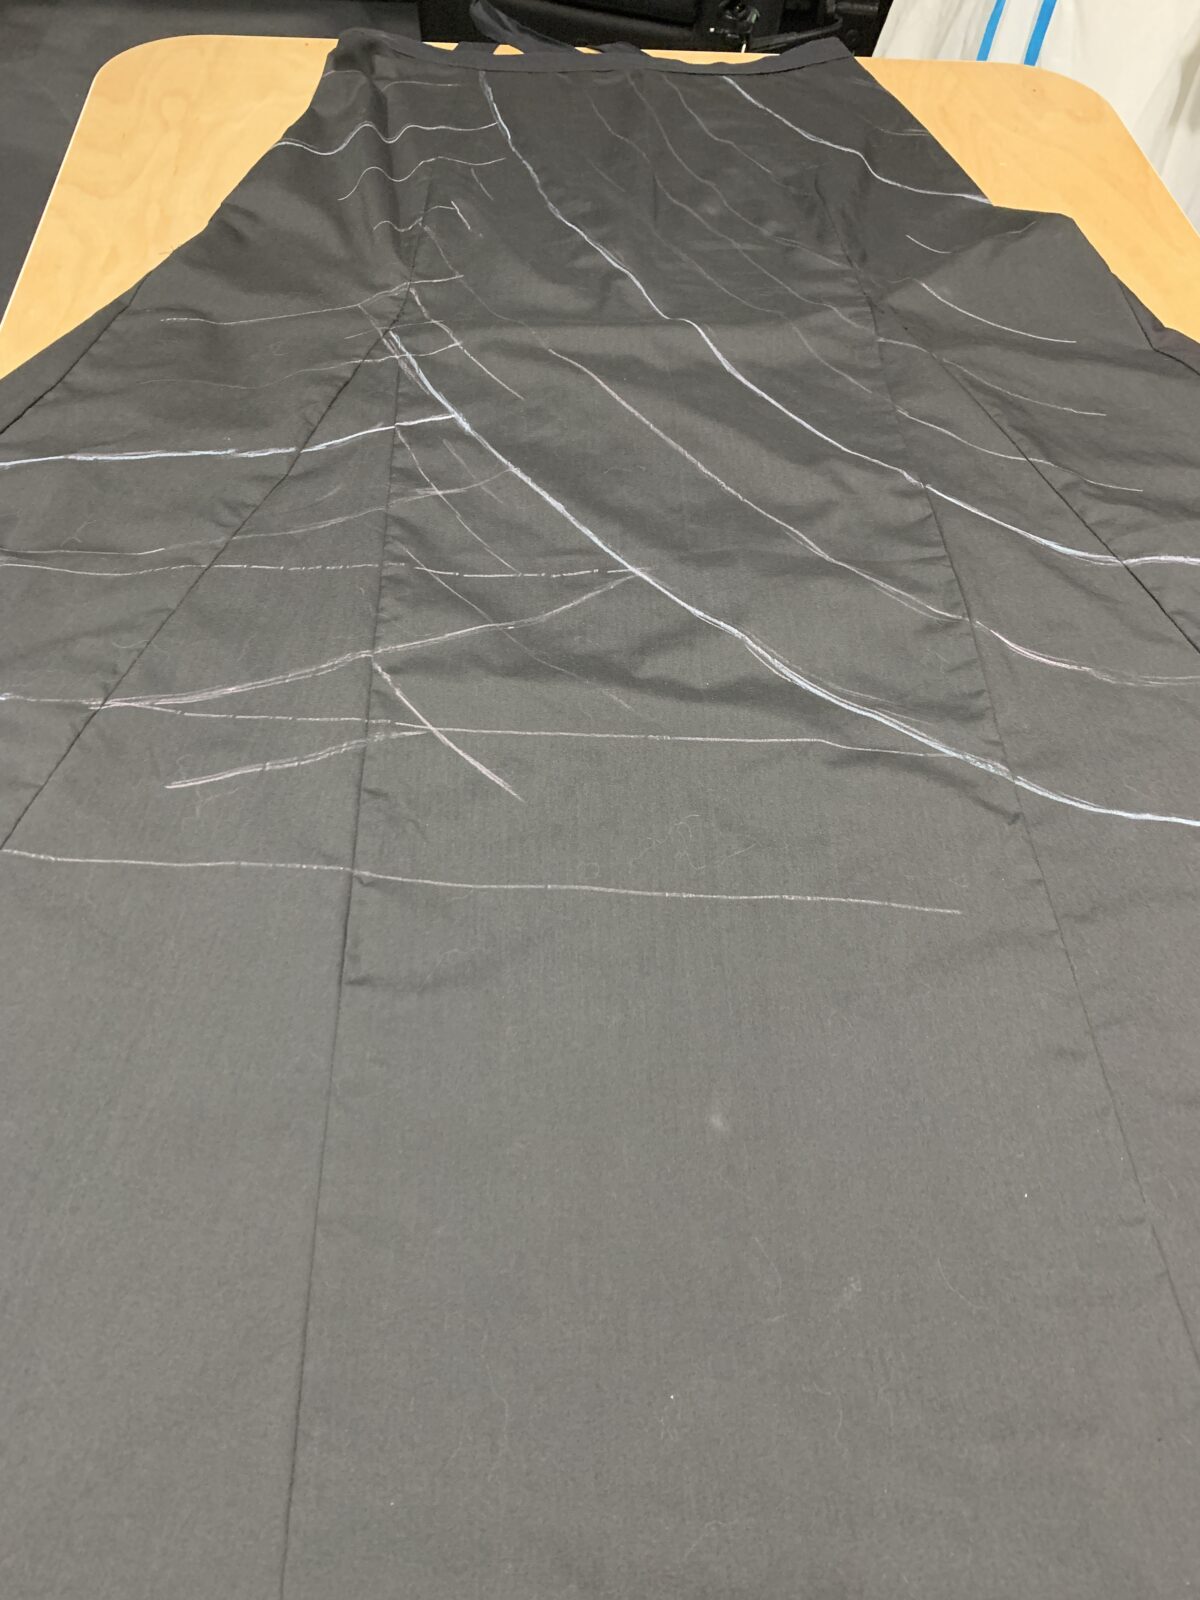
To lay out the ruffles I started with the prominent red ruffle that seems to be consistent across every version of the skirt I had referenceres for. I sketched onto the under skirt where I felt this red ruffle would sit, starting roughly over the right hip point, crossing over the front over the front and curving towards the back at the knees before ending at around the center back. From there I roughly sketched what the overall shape and direction of the rest of the ruffles would be.
I stitched a few rows in following the outlines I had defined to make sure I was happy with the layout – pausing to check and adjust the sketch lines as needed. Each ruffled was sewn roughly an inch apart, so they would overlap by one inch and leave an inch visible on the row below them. Once most of the skirt was covered in a base of ruffles I went in and added more in between to fill in any large and conspicuous gaps. Wherever I needed to start or end a ruffle that wasn’t on the waistband I stitched the edges down diagonally to tuck them under the ruffles and give them the appearance of fading away.

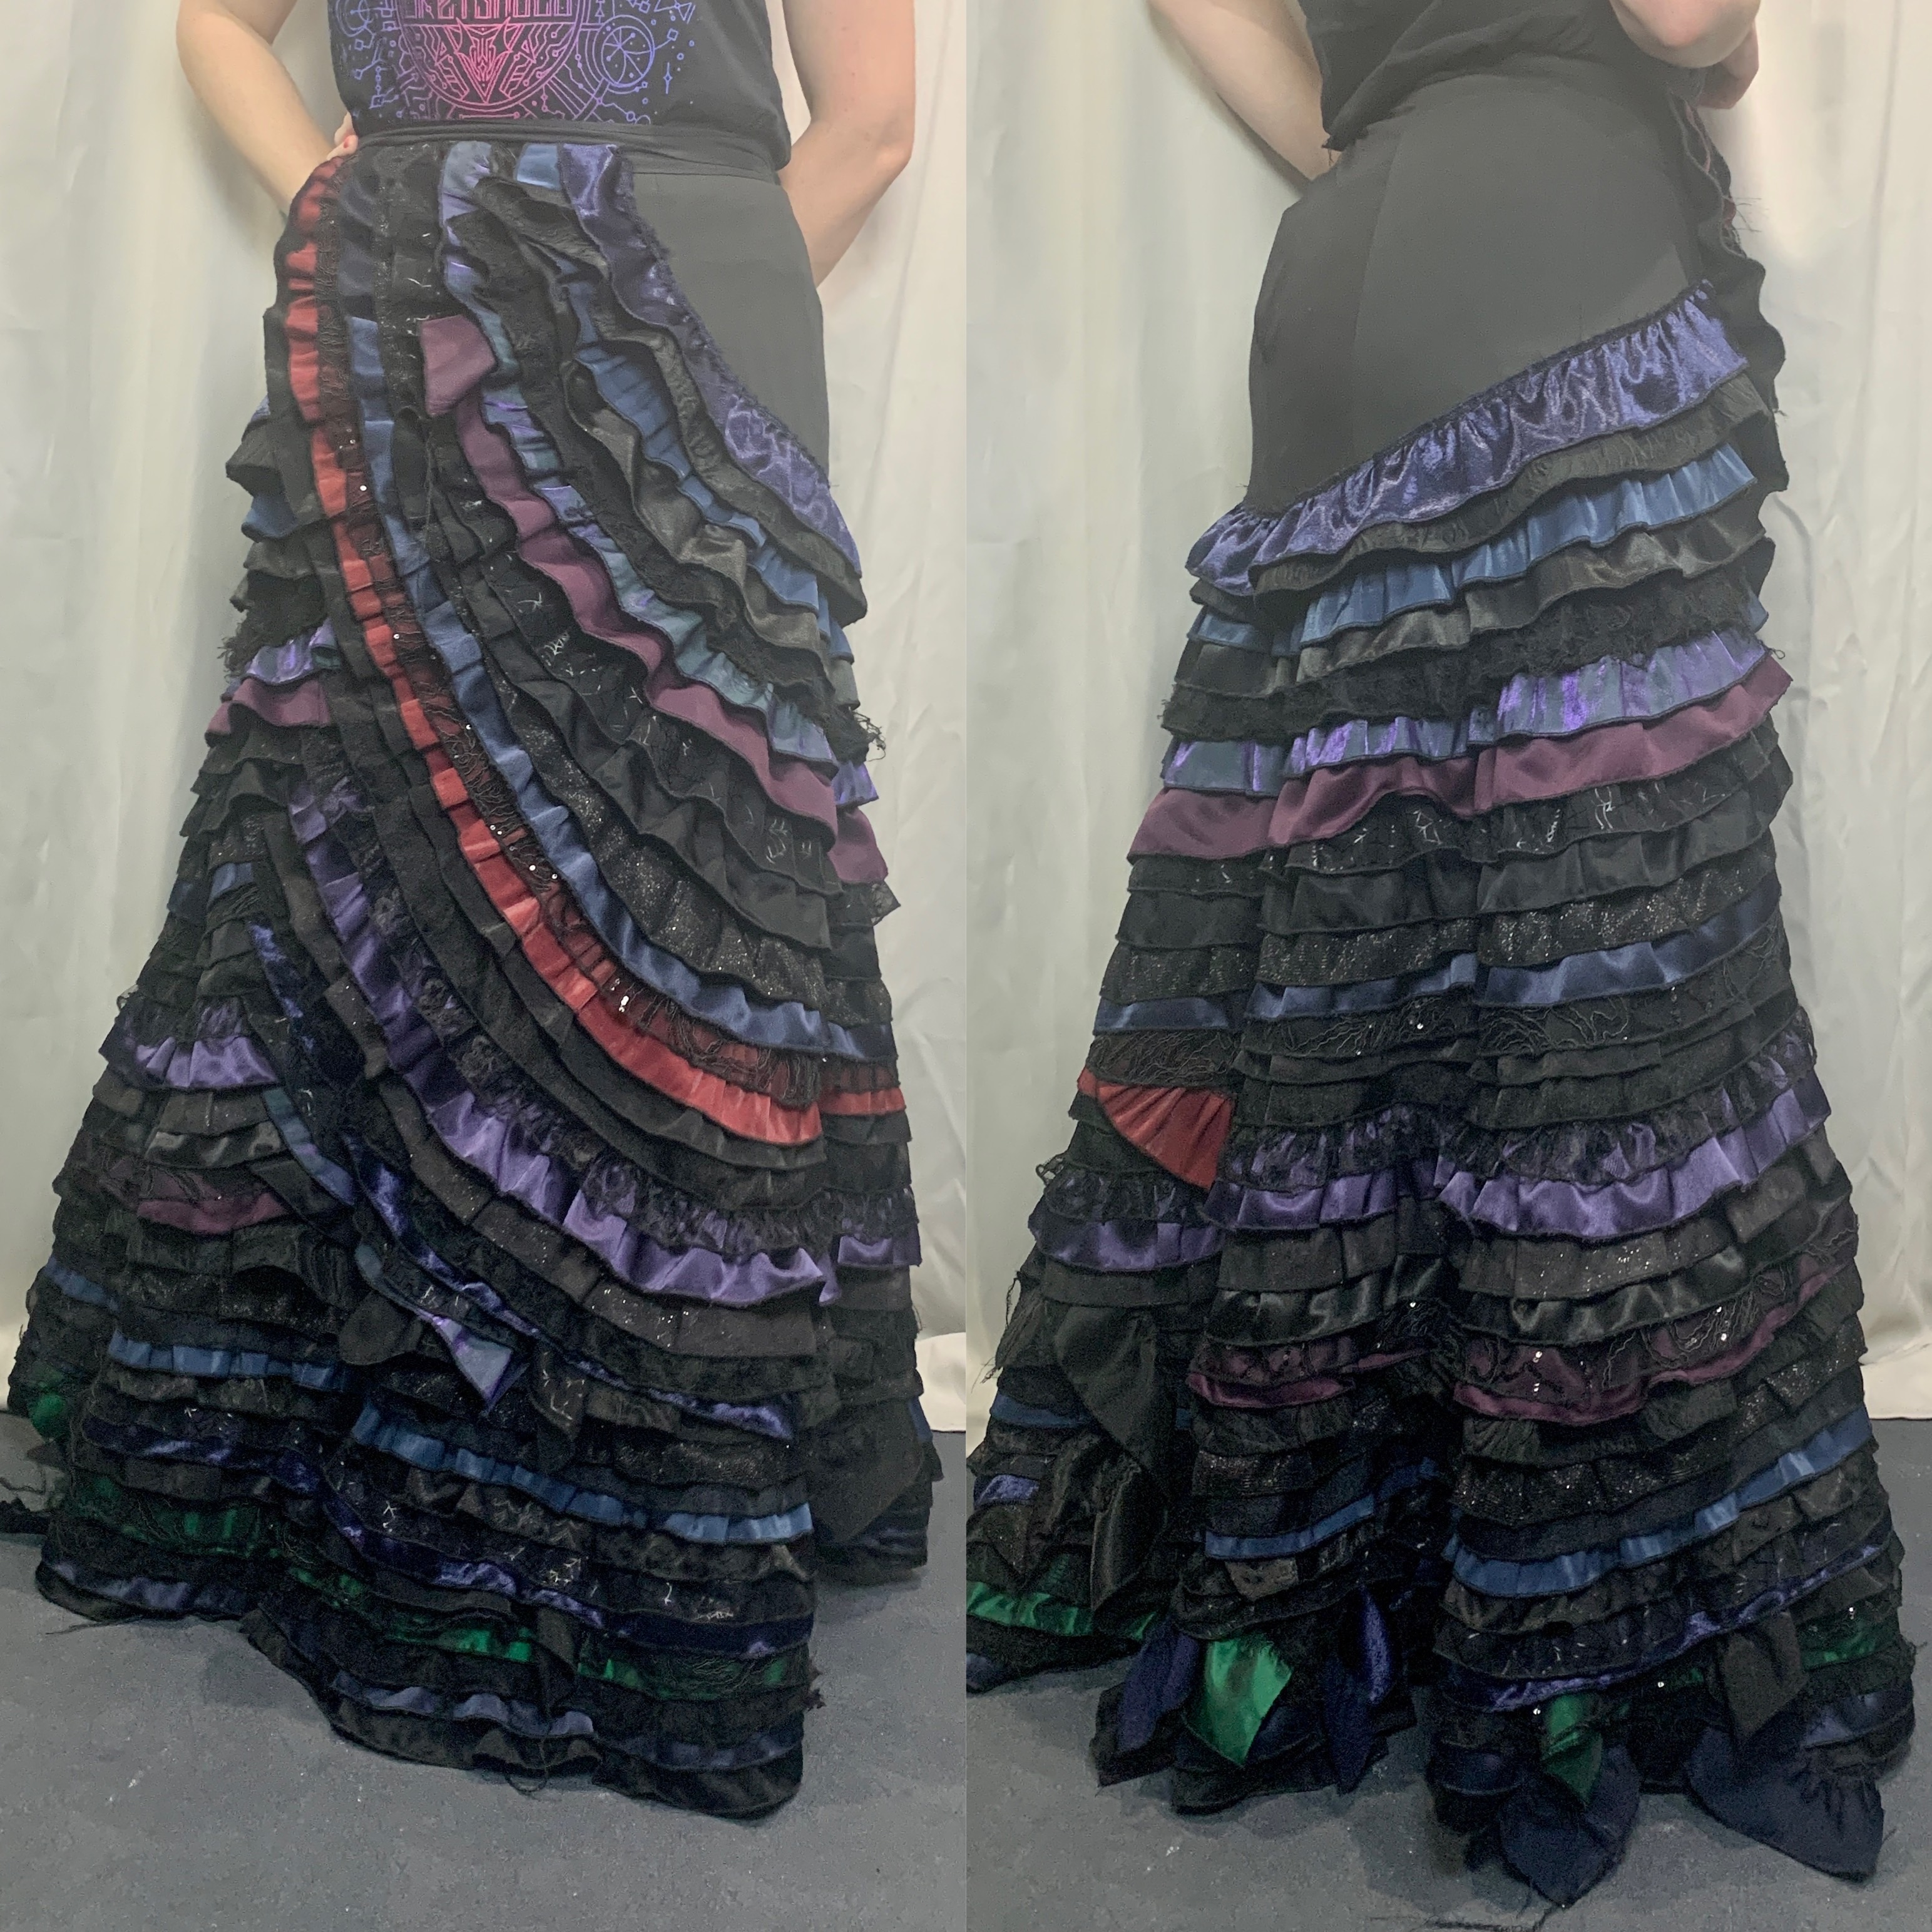
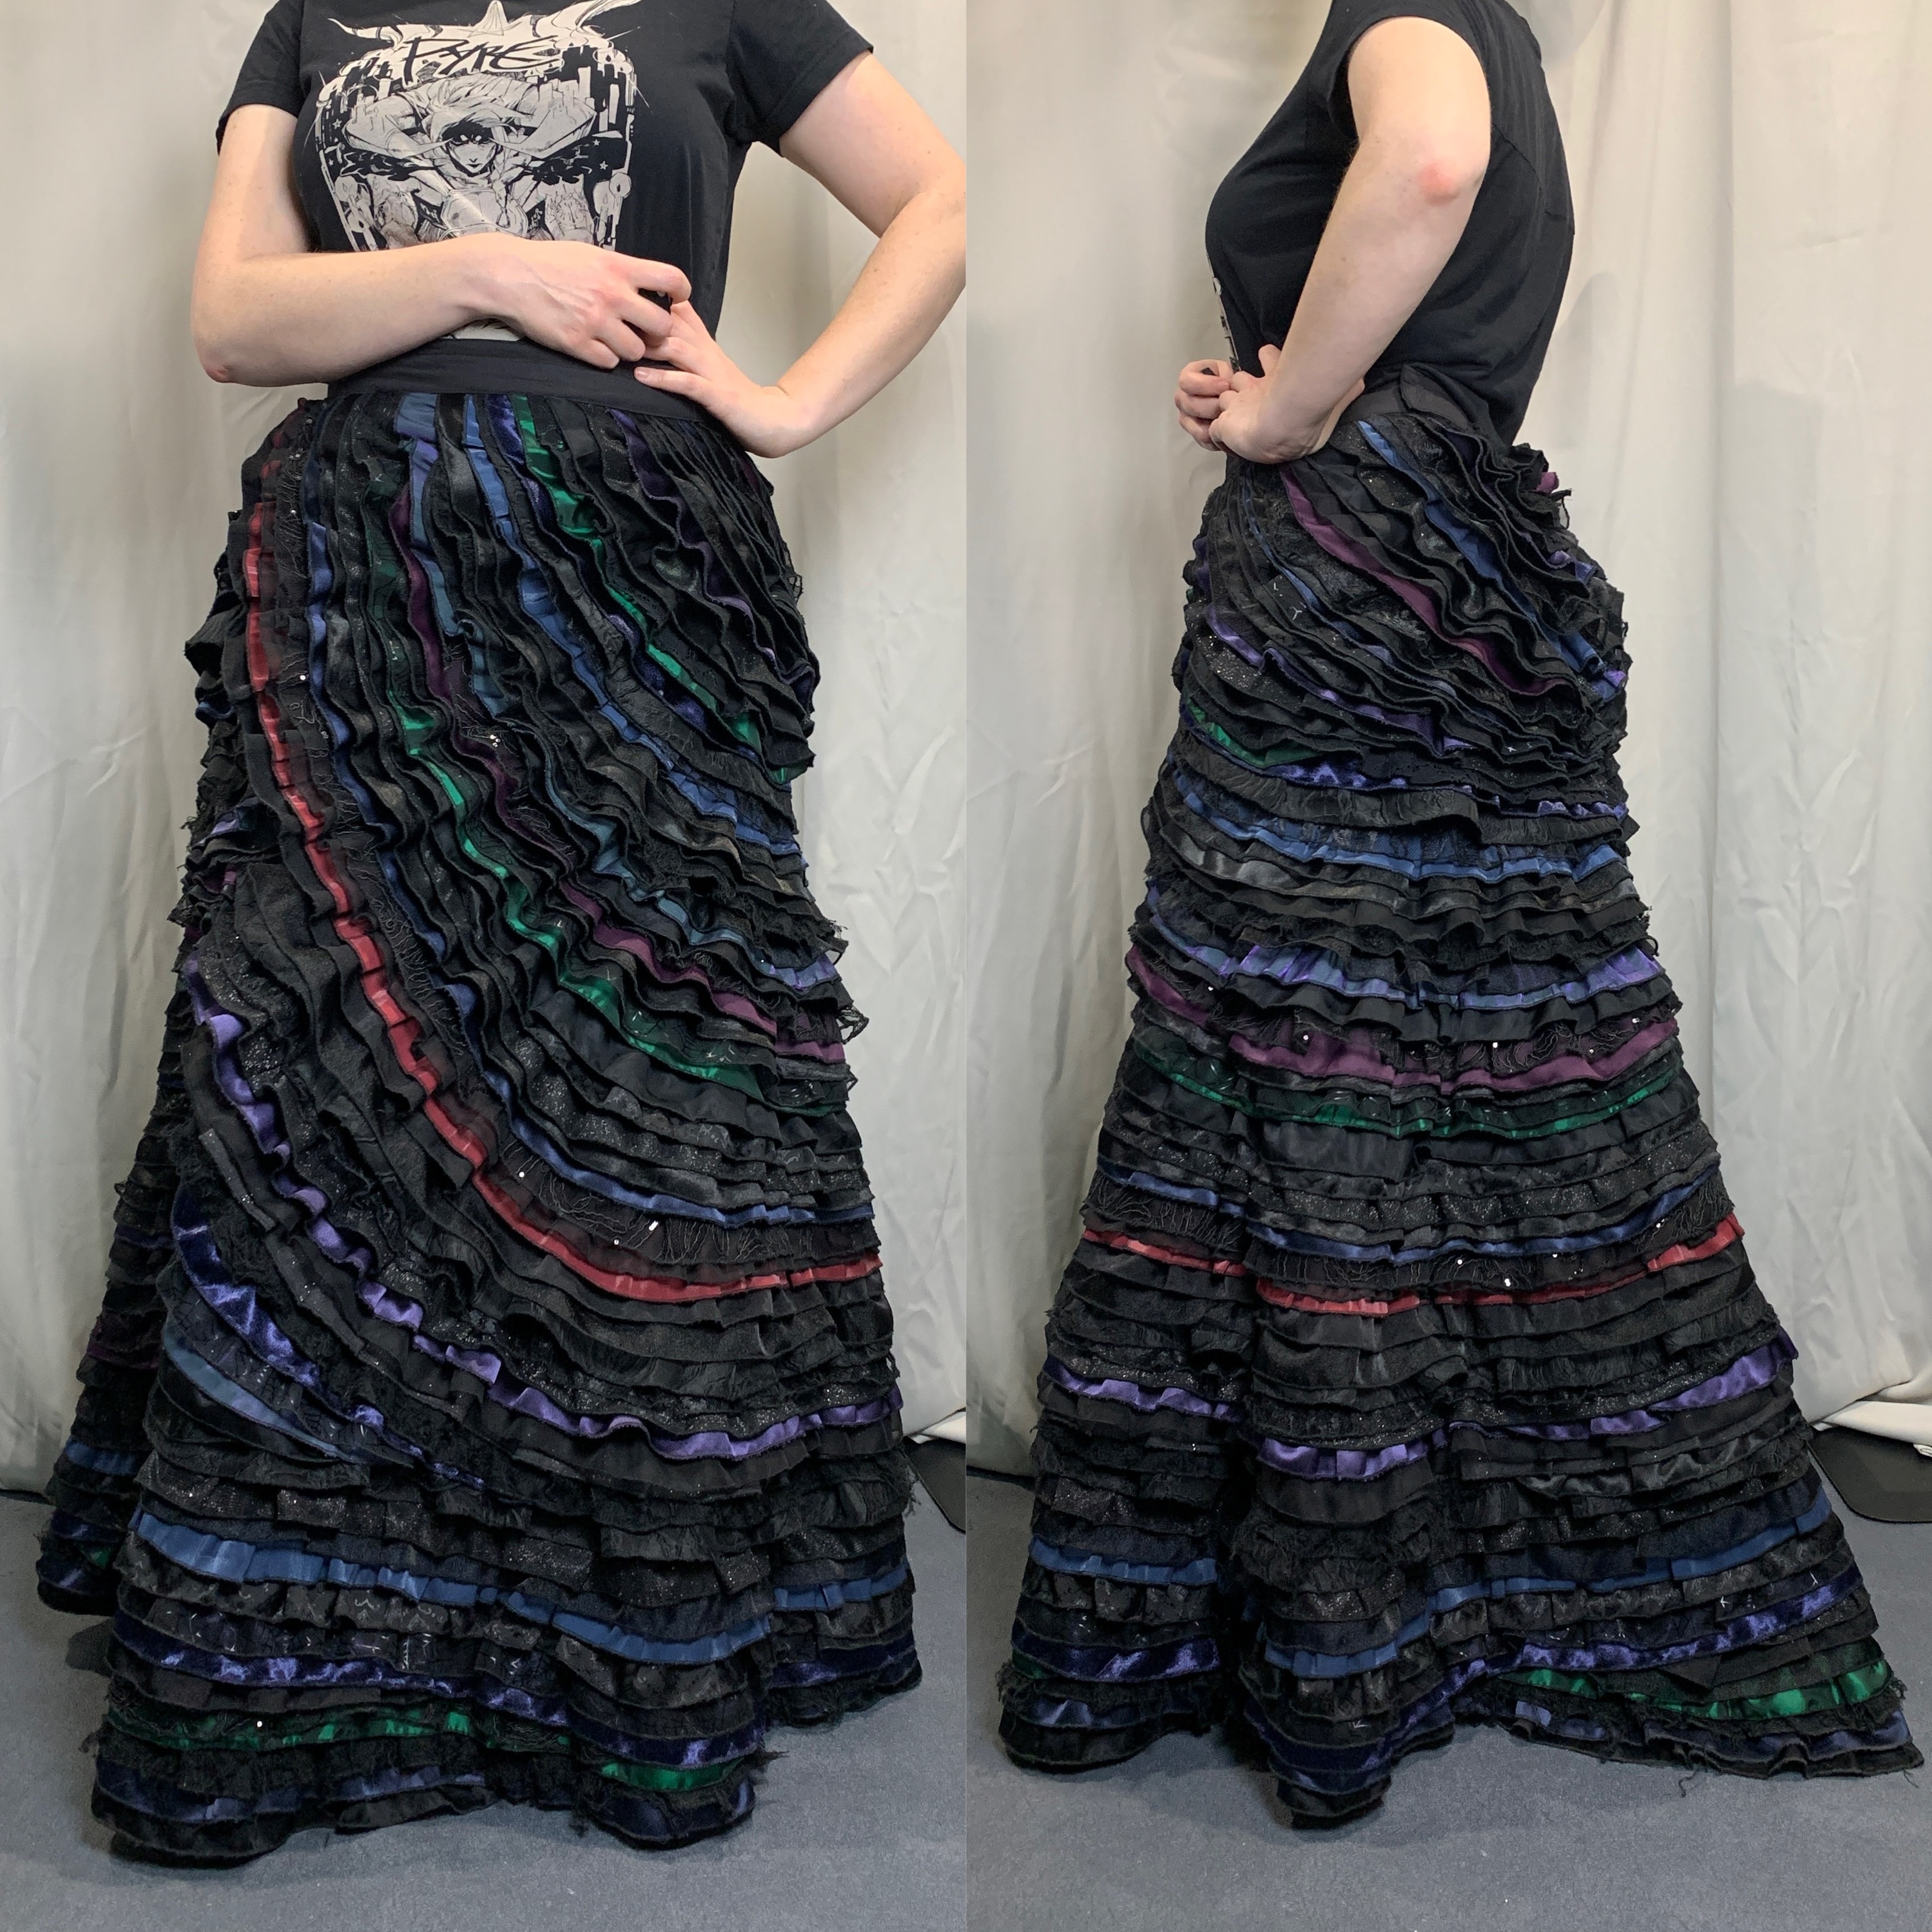
Lastly I finished the skirt with a piece of twill tape to cover the loose edges of the ruffles on the waistband, and added a few hooks and bars as closure. To support the skirt I chose to wear a fishtail style petticoat. I found a trumpet hoop skirt was too stiff of a finish and the petticoat still gave a nice motion to the skirt. I also made an underbust corset to hold up the weight and make sure it didn’t dig into my wait, all told it was about 4lbs of skirt!
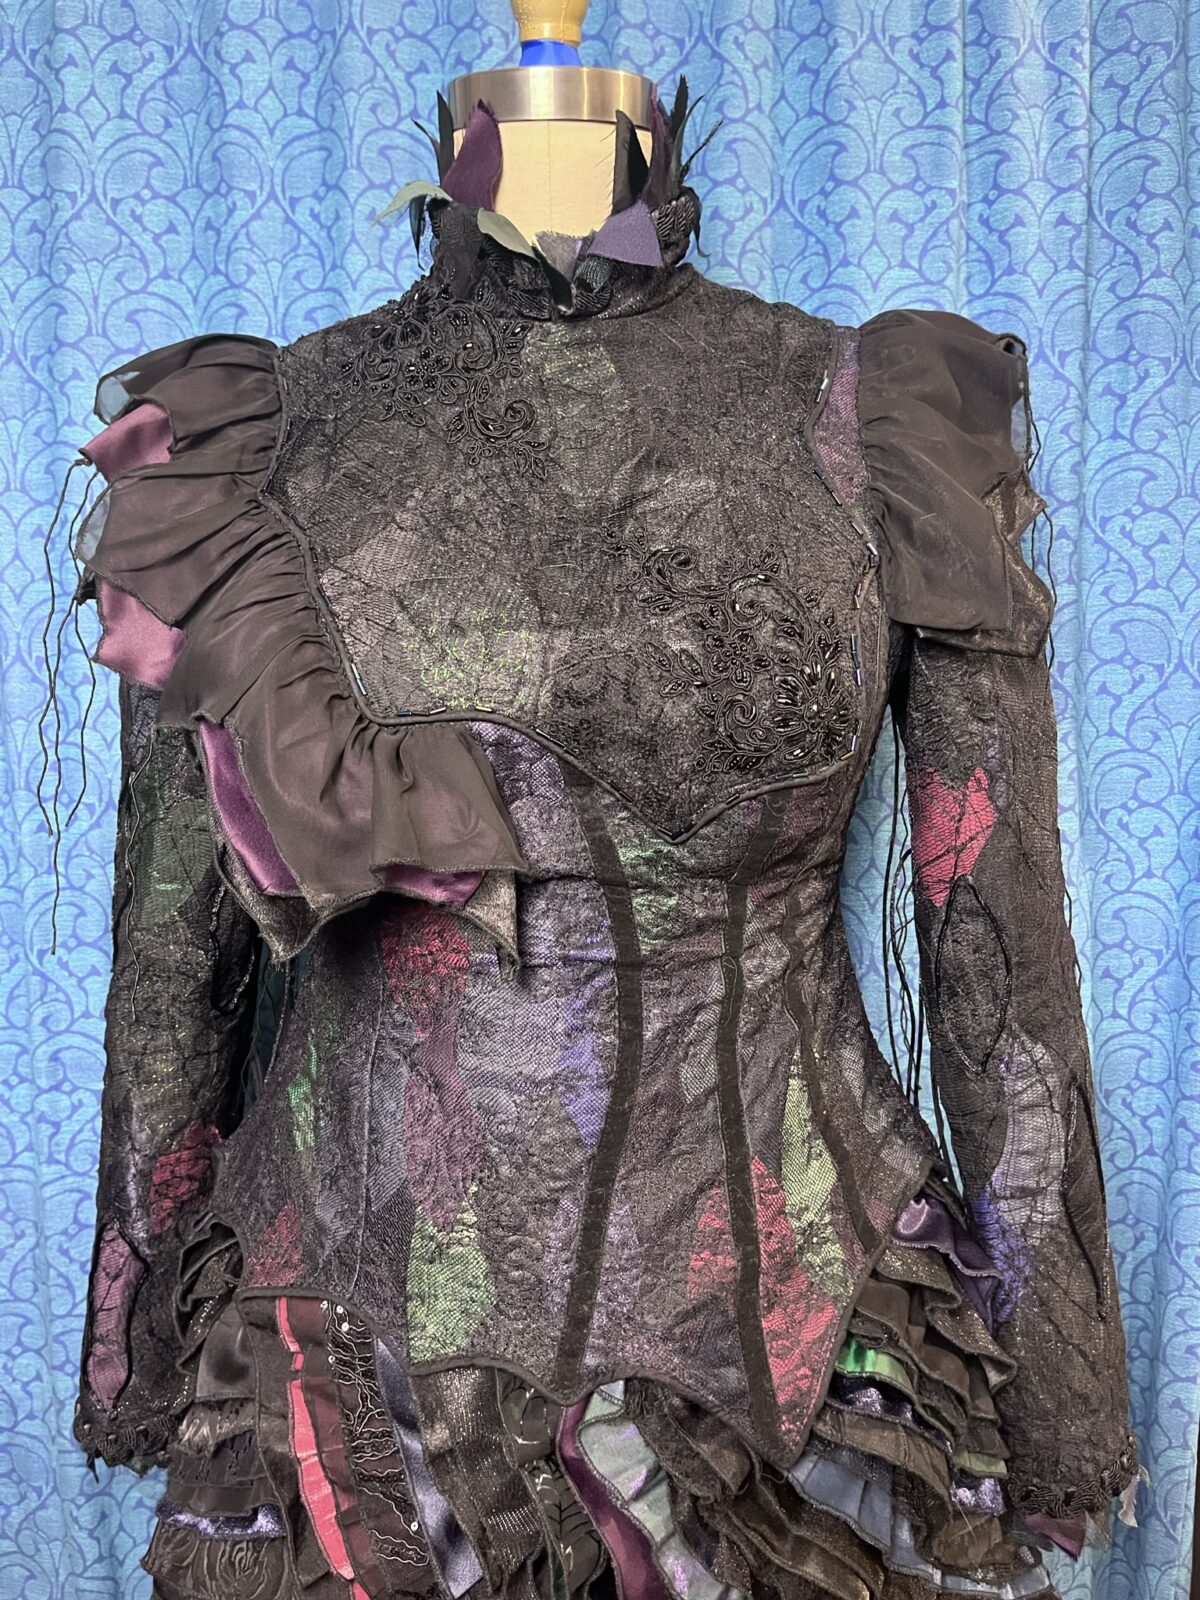
Bodice
The base shape of the bodice is a princess seam bodice with generous gussets in the arm pits, and a center back zipper. For the bodice I was able to use most of the same fabrics as the skirts, especially as I only needed small scraps of each of the materials. This was the section I struggled the most with matching the materials of the original design and chose to do something that evoked the texture but wasn’t a replica given again my constraints of fabric availability. I could have potentially purchased lot’s of samples but that would have gotten very expensive.
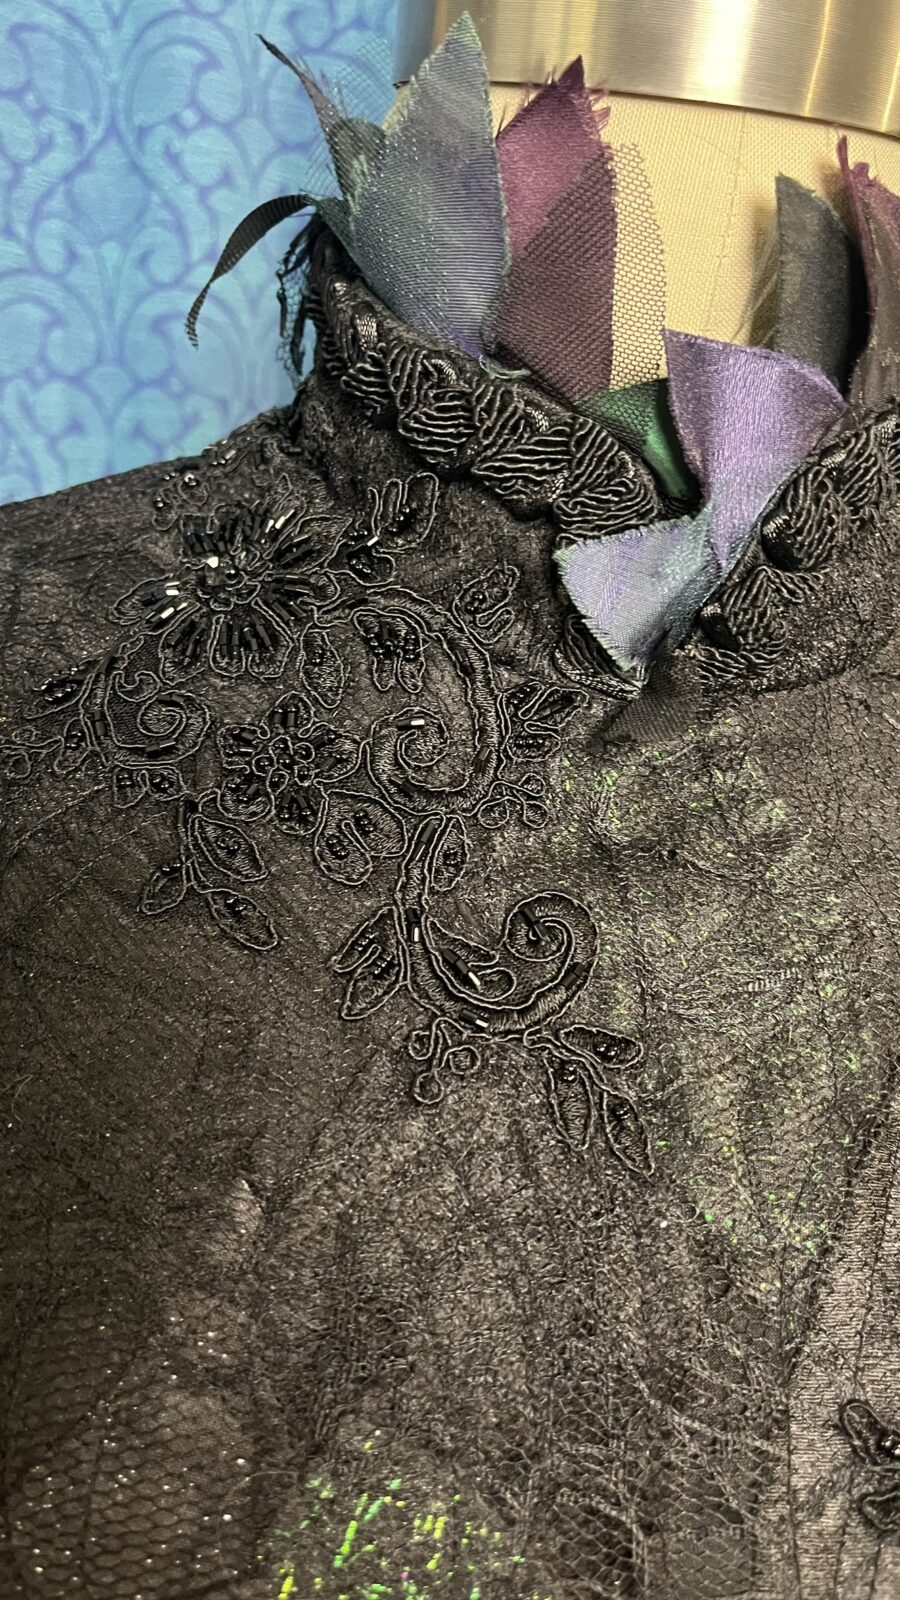
The original bodice design to my eye looks like it is made of a top section of fabric scraps that have been quilted on, these are mostly blacks and other dark colors. While the abdomen section is also made of quilted scraps, but the fabrics are brightly colored and more textured and fuzzy. In place of the quilting I used two different lace fabrics as overlays to give the texture but save me some of the work. I also am a lot less practiced at free motion quilting so this was going to give me more reliable results.
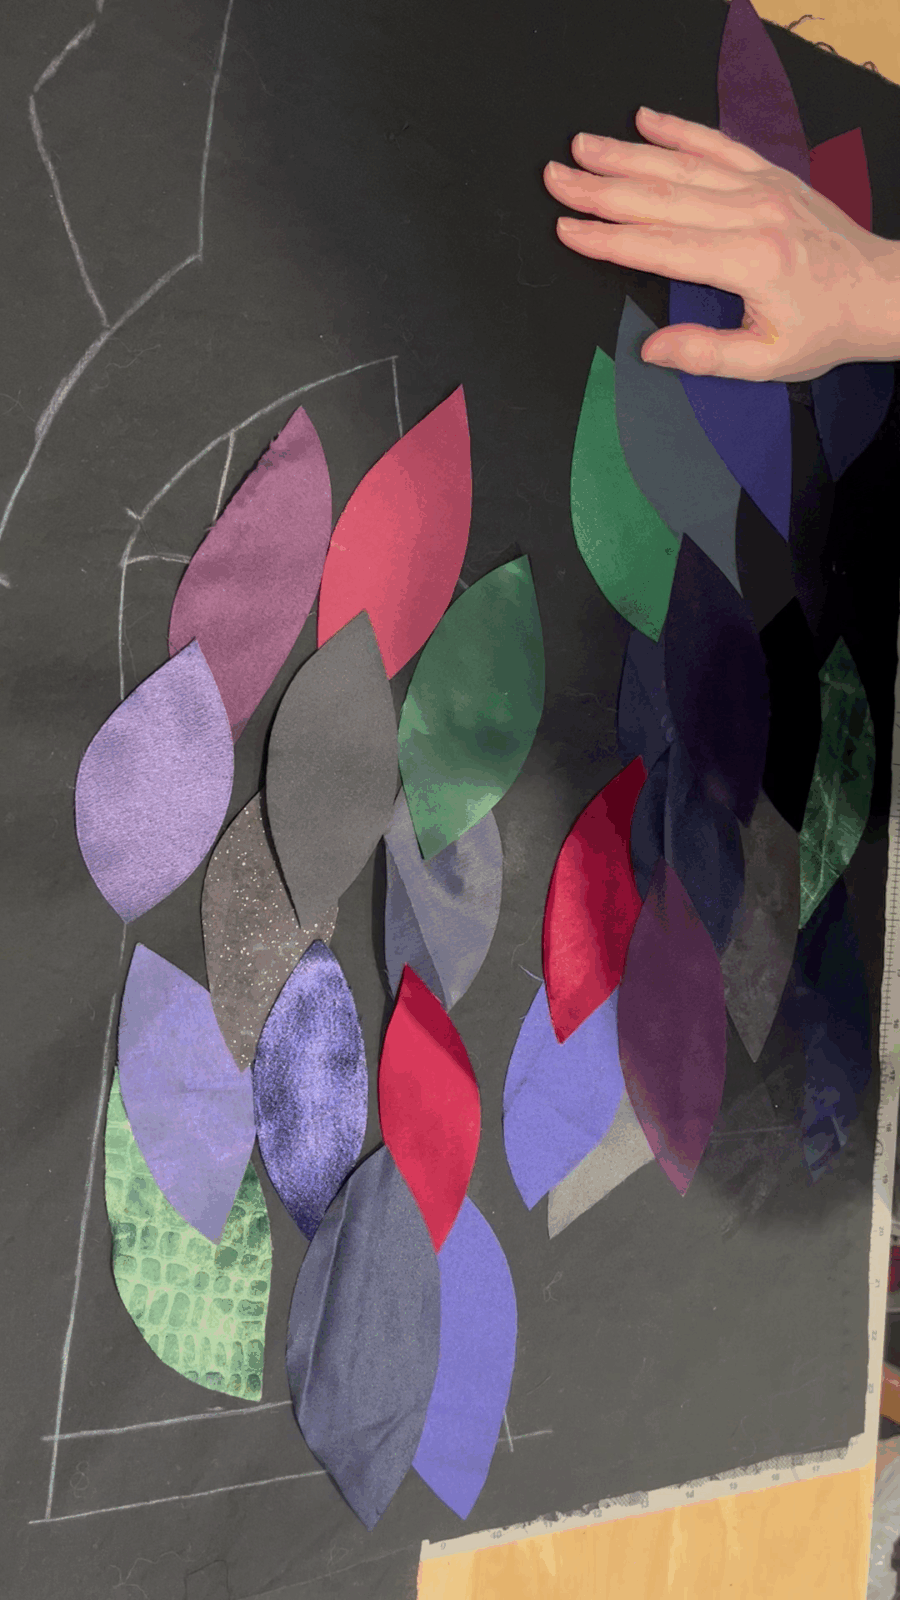
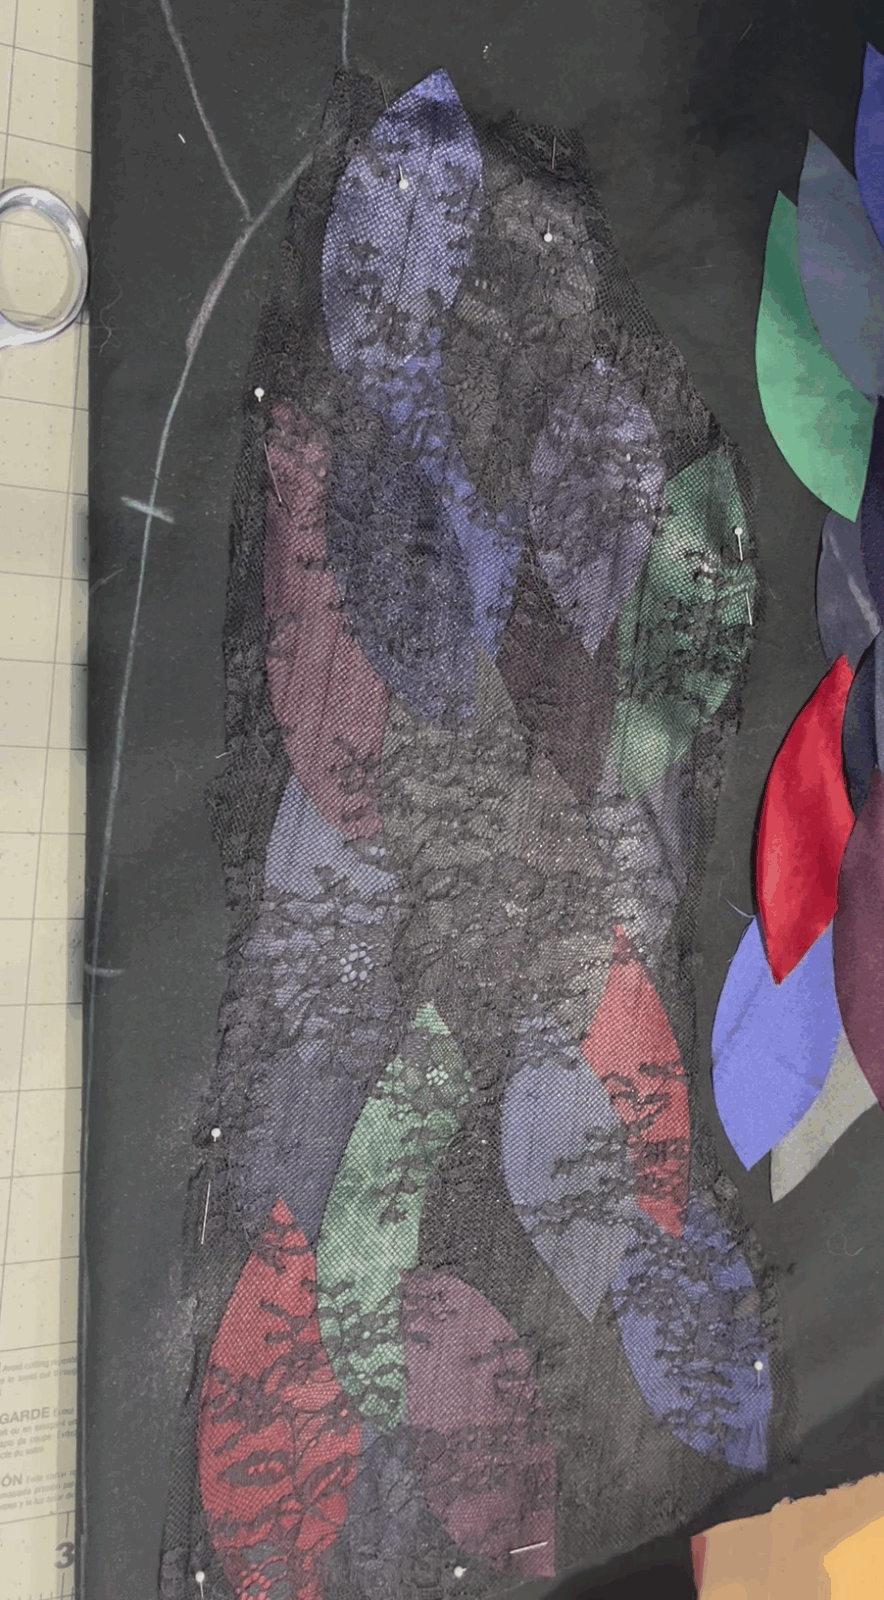
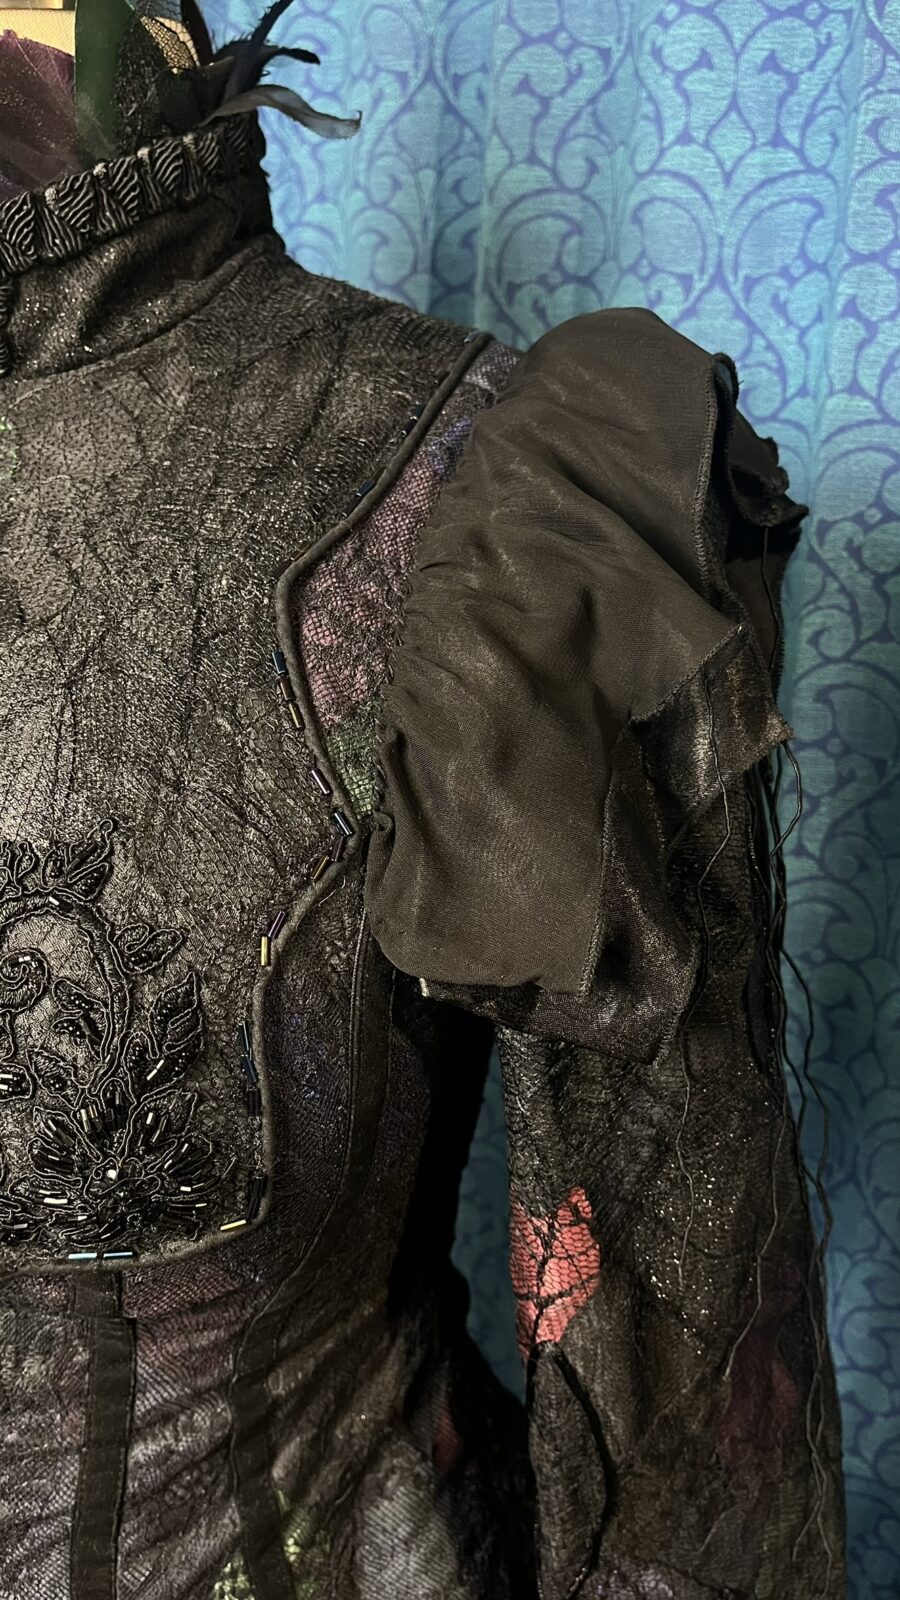
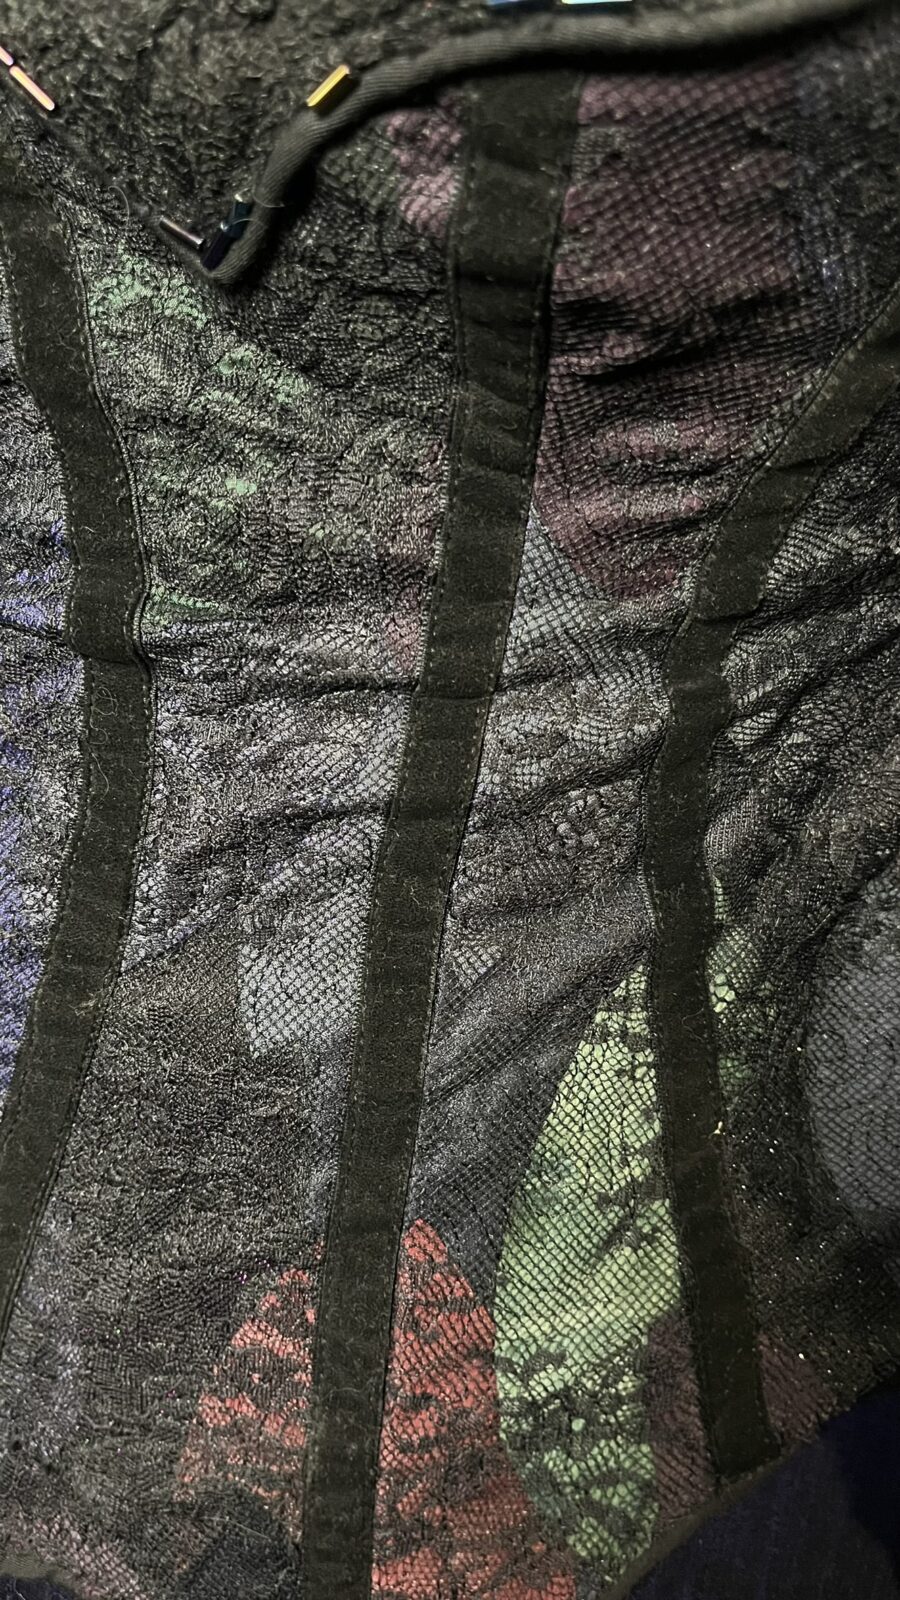
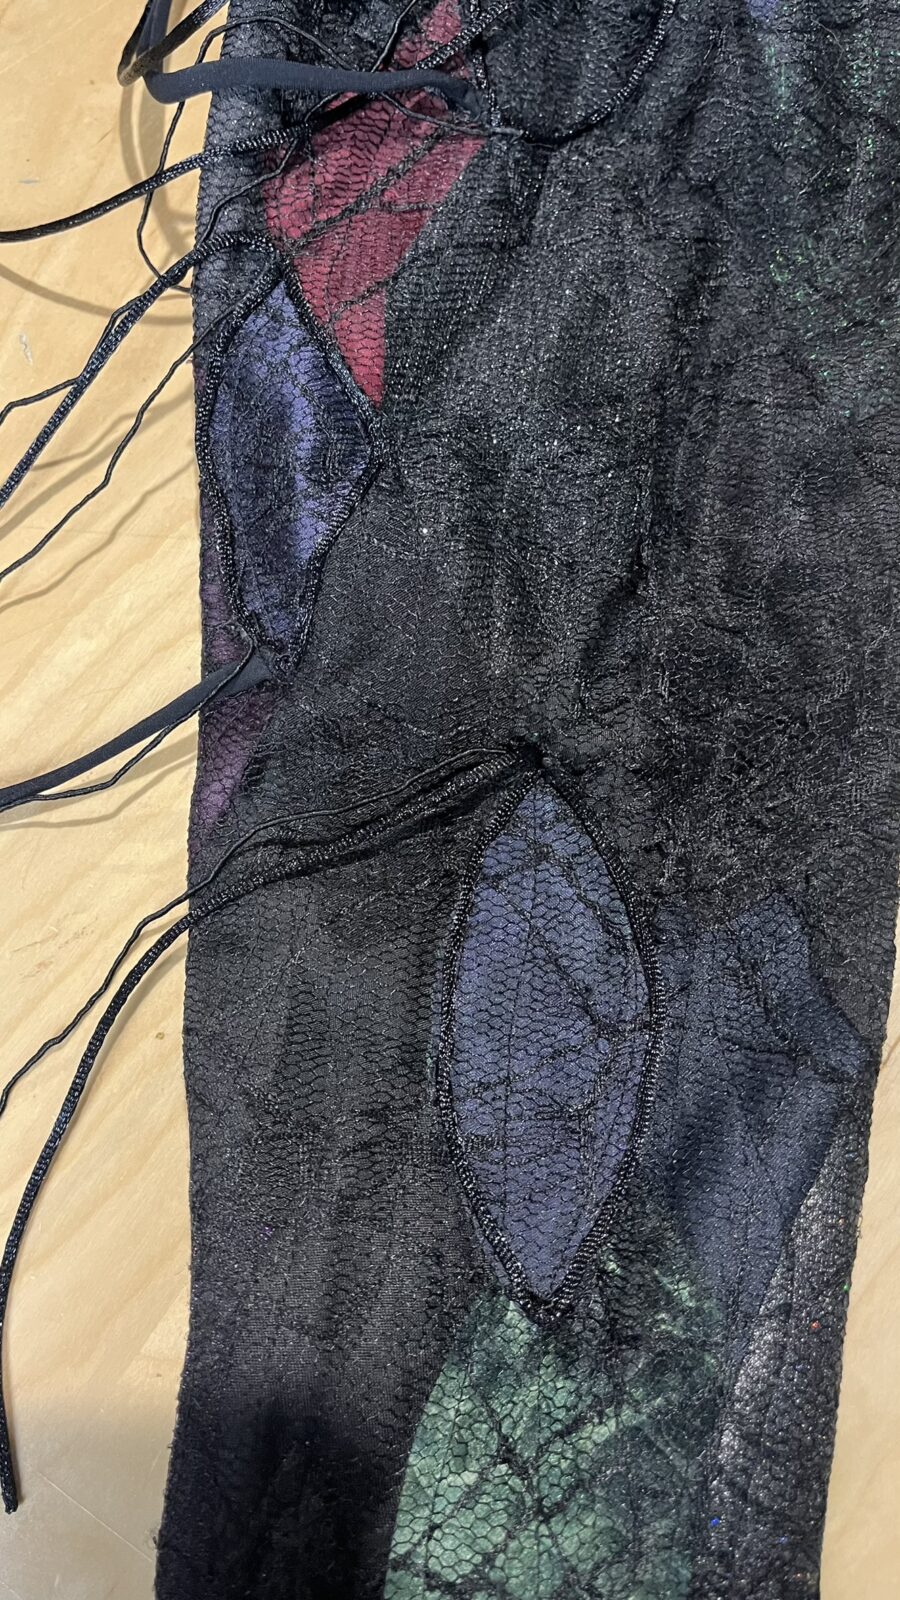
I started with the bottom section first. Cutting out a mixture of bright and dark colored fabric scraps in rough “leaf” sort of shapes, to mimic what it looked like on the original design. I then arranged these in a semi random fashion on the bodice pieces using basting spray. I then laid the lace fabric over the top.I chose to do this before cutting and assembling the pieces as I wanted to use my embroidery machine to quilt the pieces together. I was also concerned about losing some of the shaping and not being able to make adjustments if I did the quilting onto the assembled bodice. When laying out the shapes I did try my best to match up the leaf colors along the seams so that once they were stitched together they would have more of a subtle transition and hide the seam better.
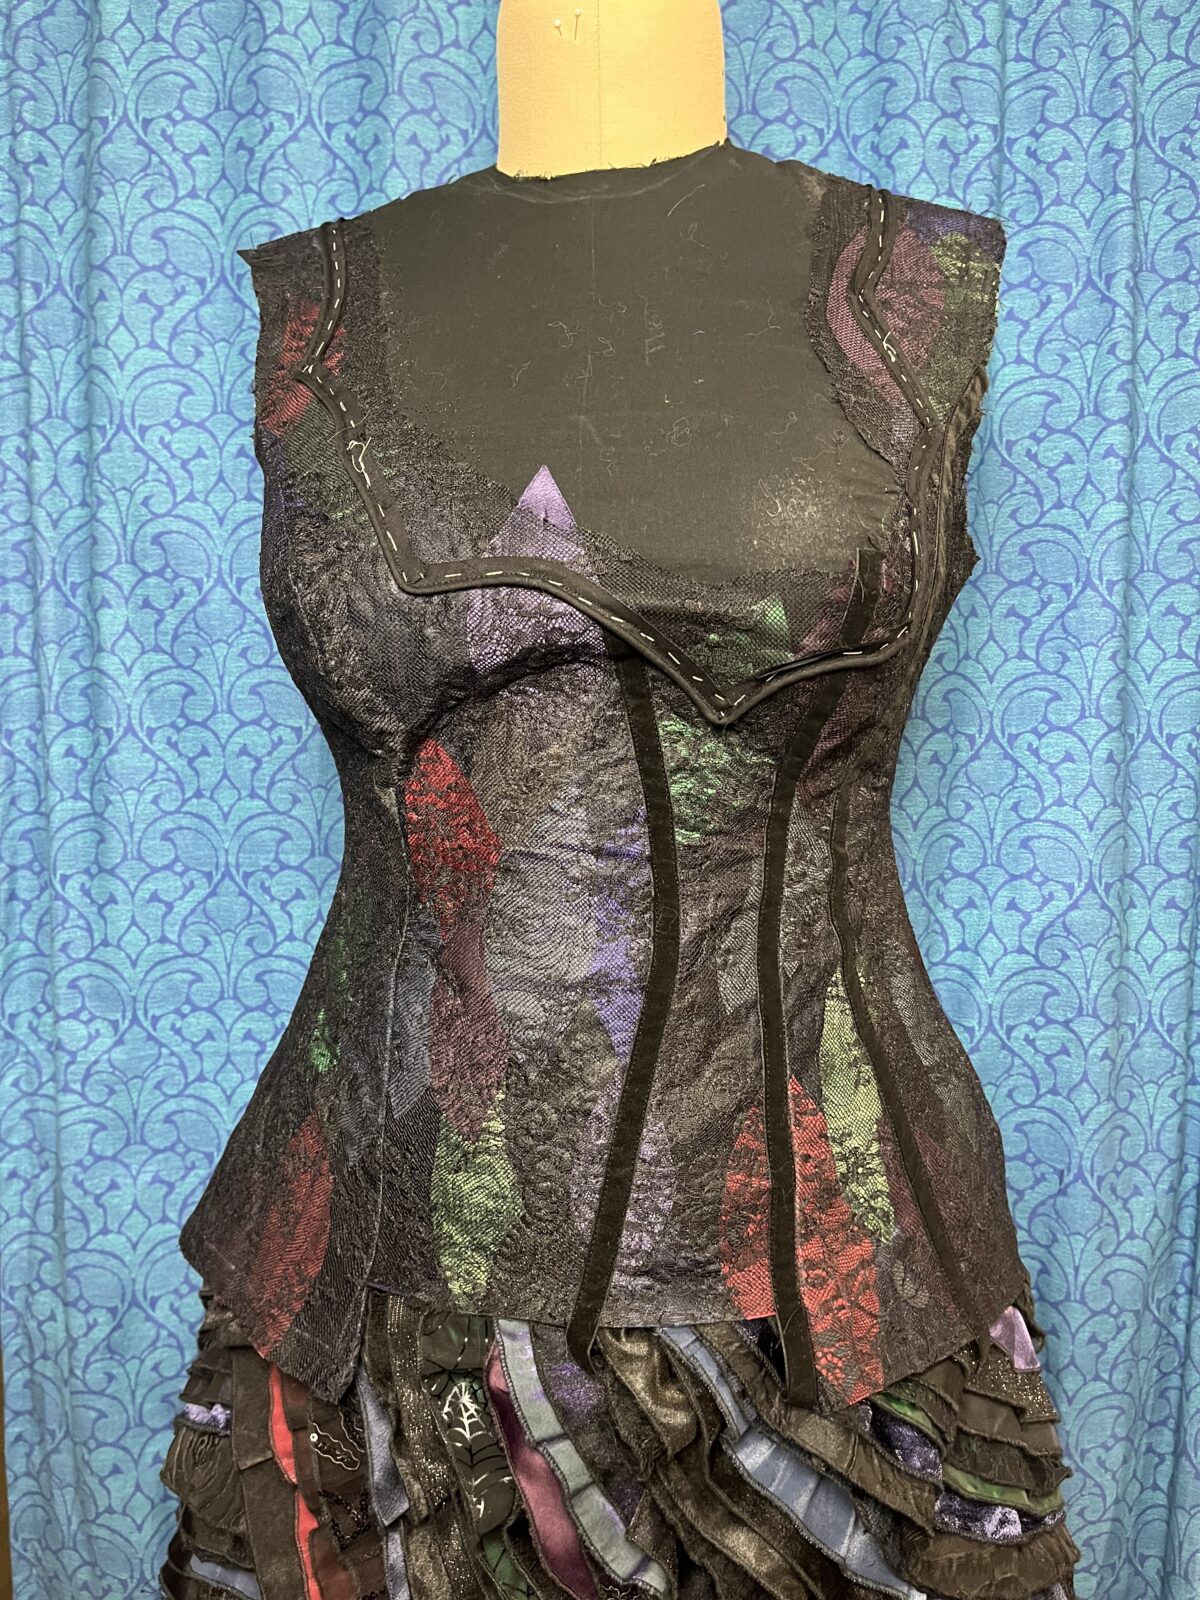
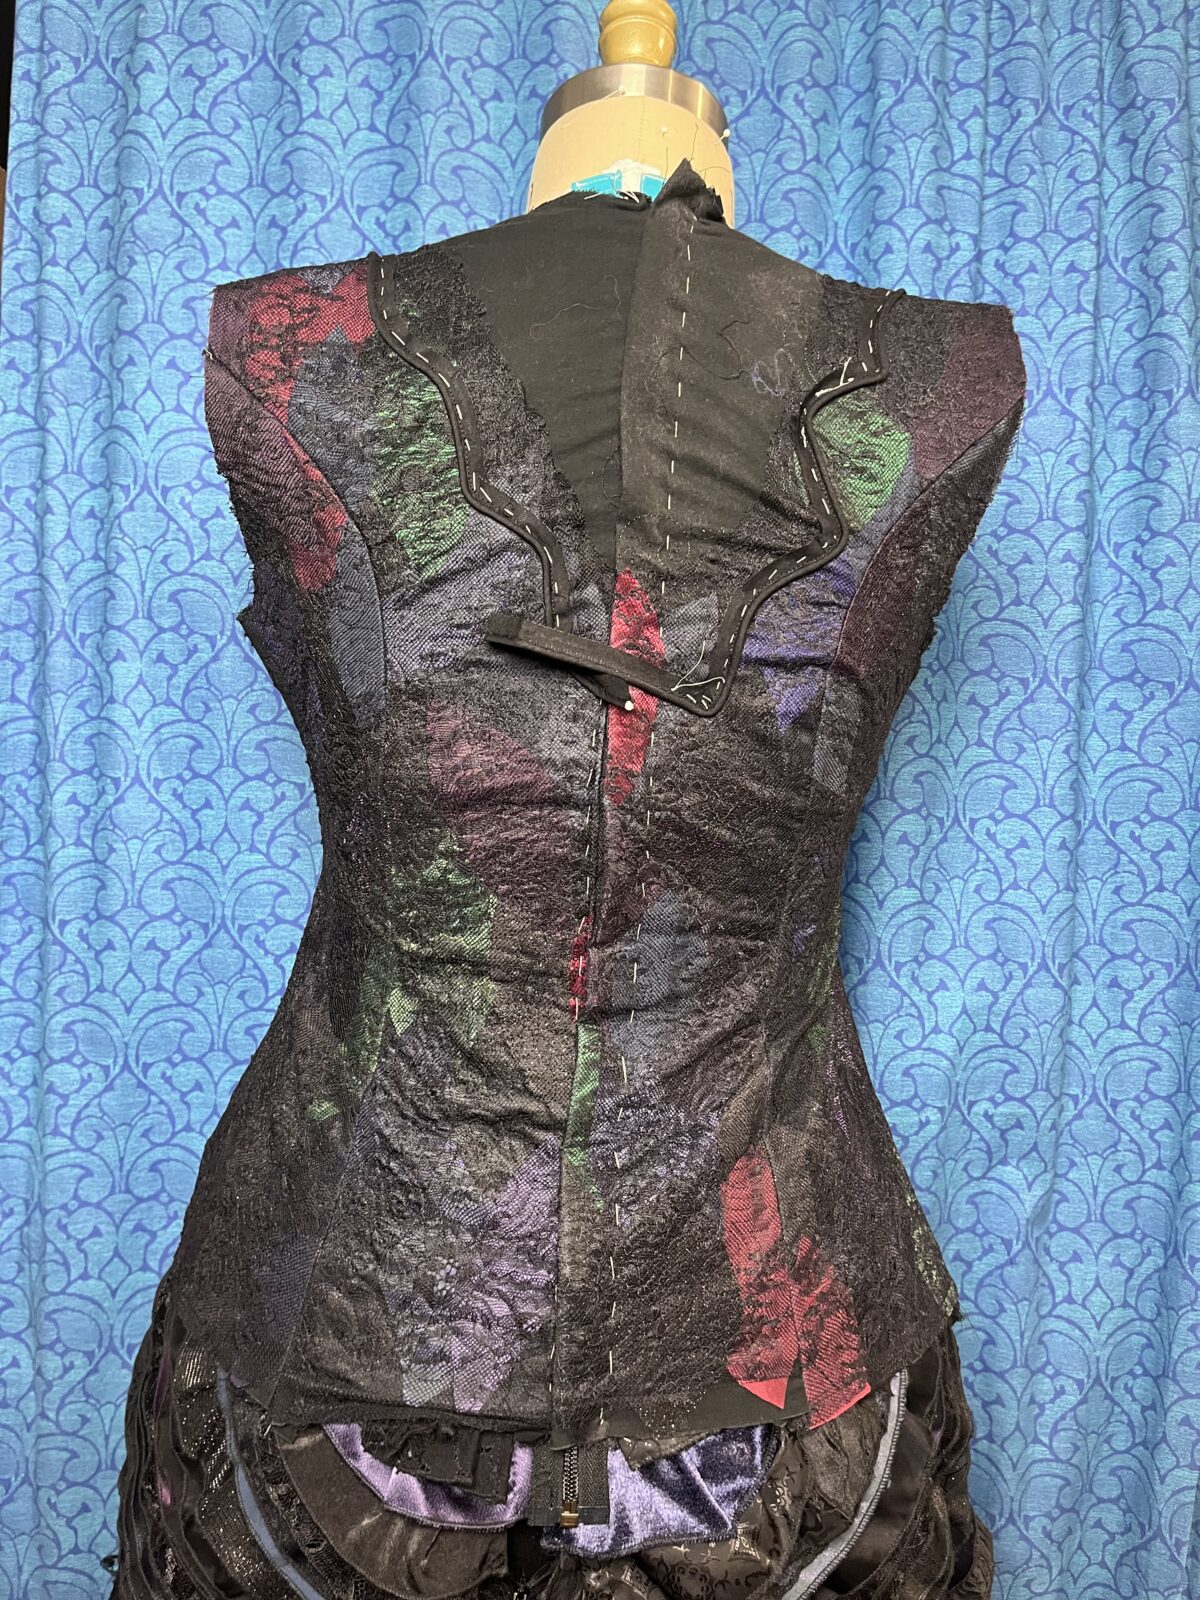
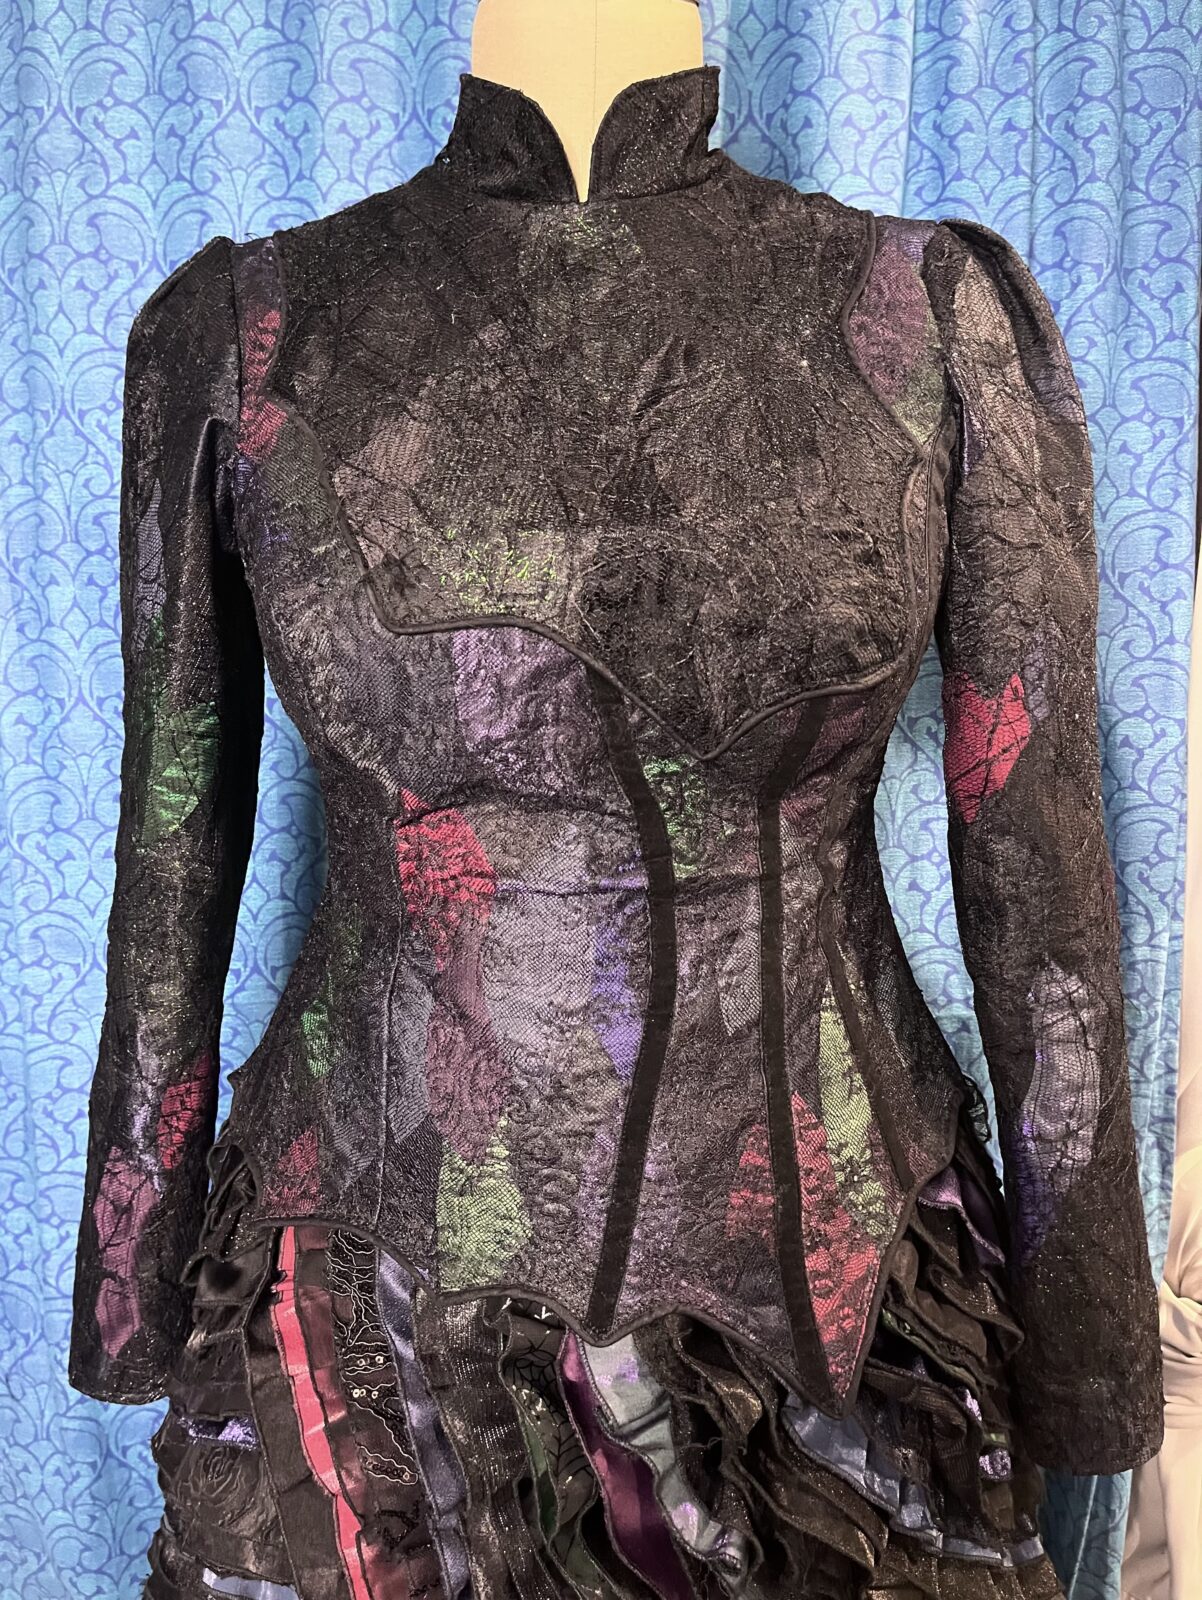
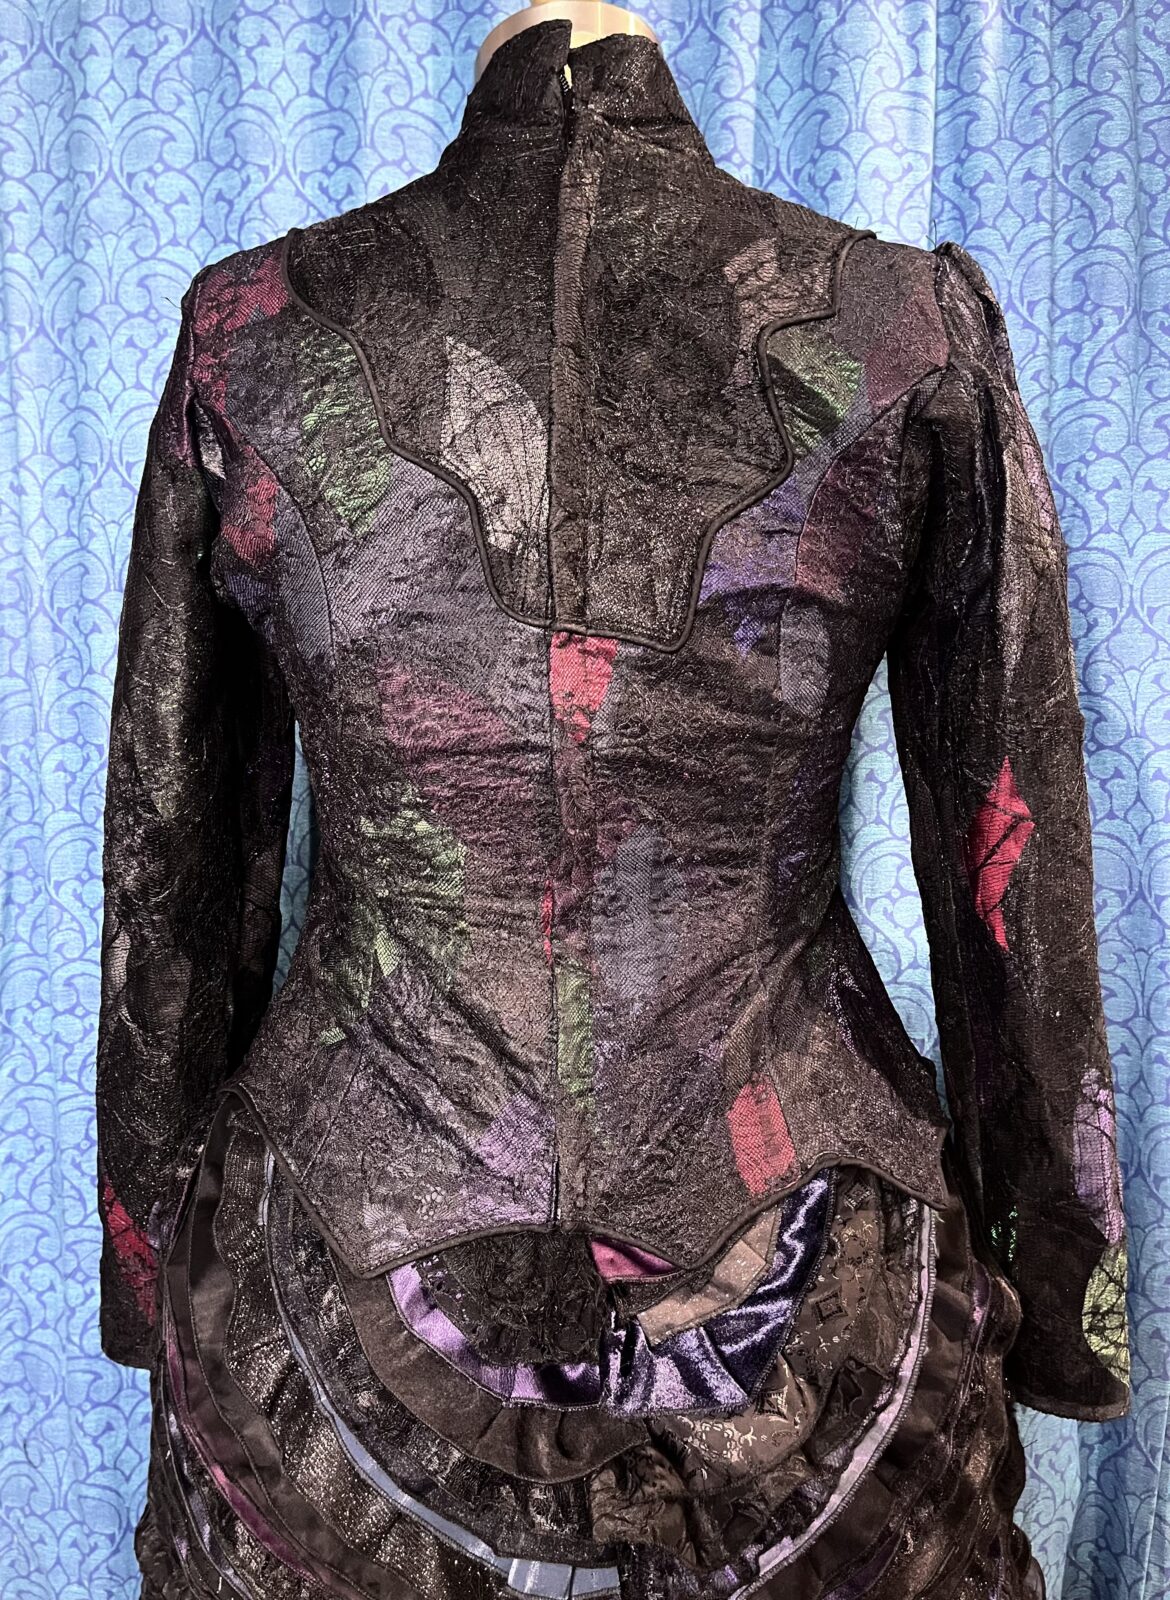
After the individual pieces were done I cut them out and assembled the bodice. I marked the outline of the upper section and stitched piping along the outline of the area. I then arranged scraps of fabric to fill the space. The upper scraps were mostly dark fabrics cut in a similar leaf like shape, and I used a “spider web” patterned lace as the overlay. I quilted this section together with long machine stitched lines roughly following the edge of the fabric scraps. The sleeves used the same design as the top of the bodice – darker leaves and the spider web lace – with a few more bright colors thrown in.
I then just had lots of little finishing touches.
- I stitched the purple and black ruffles along the shoulder and piping edge. These were done by stitching the ruffle right side to the bodice and then folding it over to hide the gathered edge and also giving more volume.
- I top-stitched 3 lines of velvet ribbon over the bodice seams and to each side of the seam.
- Hand stitched beaded floral appliques onto the yoke section. I had some intention of making these myself but it turns out I am not great at beading and also not super fond of doing a lot of it.
- I added the trim on the wrists by folding over a ribbon trim I found and adding the fabric scrap ruffle.
- I machine stitched the piping to the hem and then I hand beaded the bugle beads to the piping at the hem and yoke.
- I outlined a few of the leaf shapes on the sleeves using hand stitched rat tail trim. And lastly added the black strings on the ruffles and sleeve to evoke the original design, these were a combination of pulled apart braided gimp trim and rat tail trim.

Hat
The hat pattern was a fairly straightforward witch hat pattern – a round brim with a pointed cone. The cone is off center on the brim to give it the characteristic swoop to the side, and it also has a slight bend at the top down through an added dart in the back seam.
The trickiest part was the fabric. Looking at the images I decided it wasn’t a pure black fabric, but rather it appeared to be navy with a black texture pattern over the top. Being unable to find this I decided to make it myself! I made a stencil of a snake skin pattern using a template from an Etsy store (which is no longer available) which I scaled and cut out of stencil plastic using my cutting machine. I then marked onto dark navy fabric the pattern for the hat cone and brim. I placed down the stencil and used black fabric paint to add the texture.
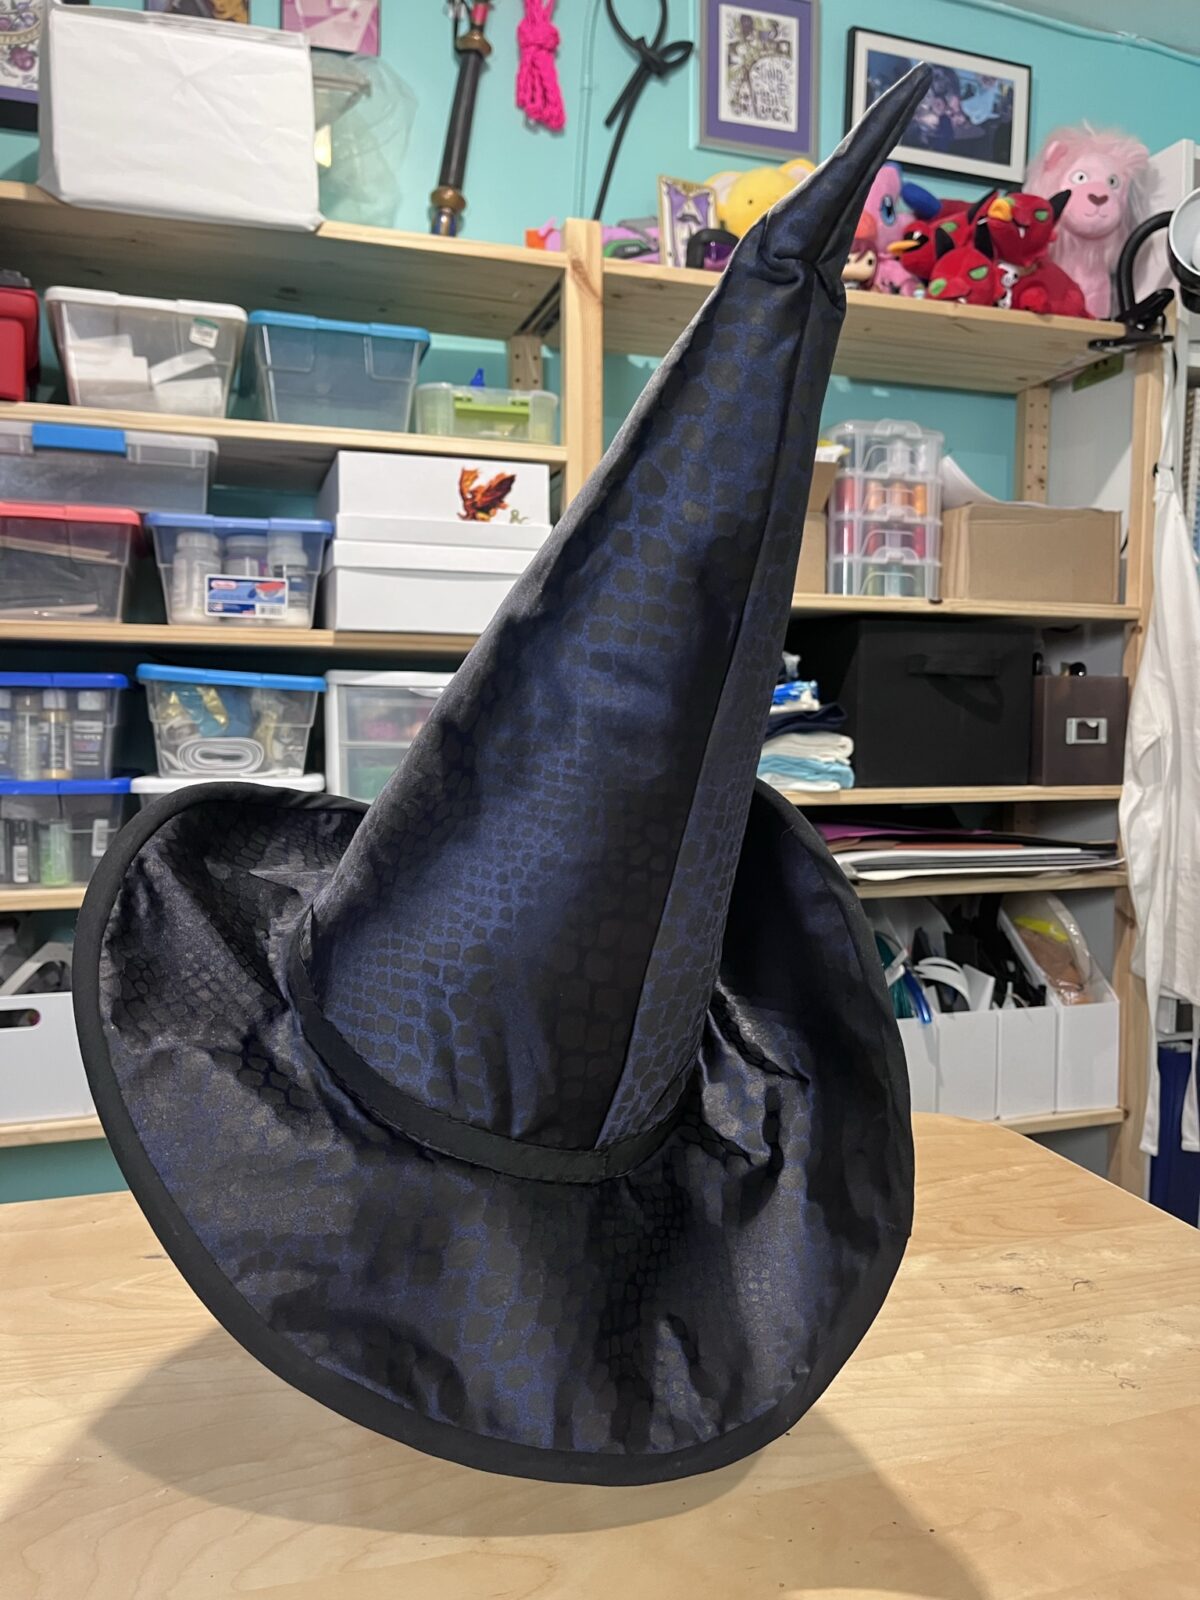
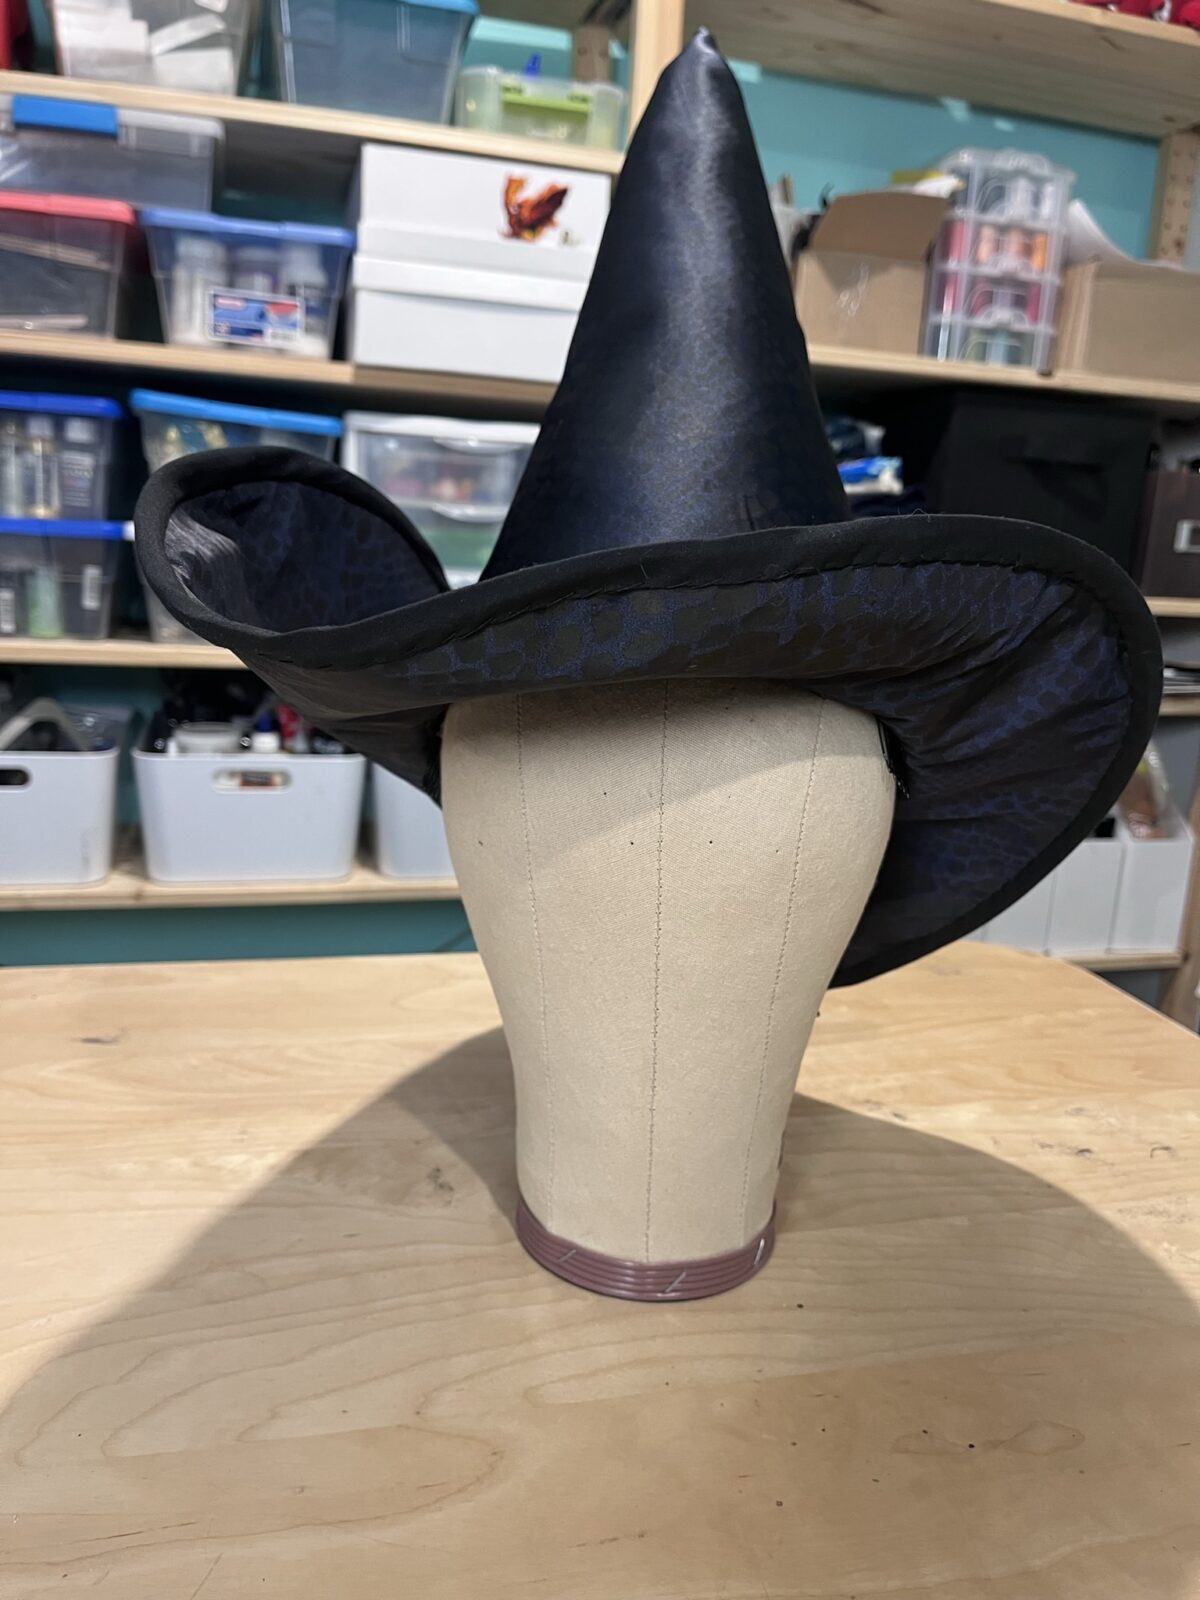
After that I sewed the brim to the cone, one version of two outer fabrics for the outside, and one with a lining for the cone and out fabric for the underside of the brim. I added thick interfacing between the two pieces of the brim and slightly lighter interfacing on the cone. In hindsight I think foss-shape would have given me a better and more stable result but such is the learning process.
I added thin wire to the edge of the brim to allow me to shape the swoop in the hat, and should have made the top of the brim a little smaller to avoid the wrinkling I did end up getting. I also added some stuffing into the cone as I found it was more susceptible to being squished than I wanted. I finished the edge of the brim with bias tape and added a ribbon around the base of the cone. Lastly I sewed some cones onto the inside to keep it attached to my wig.
Check out my tutorial for more detail on making a witch hat:
Makeup
The makeup I used was Mehron AQ Paradise in Amazon Green, and I more or less followed the existing tutorial from the musical Makeup Artist:
For the gloves I used the We Love Colors seamless nylon gloves. I started with the Kelly Green color but found it was too bright and not the right match for the makeup and character. I stripped some of the color out using Rit Dye remover and then re-dyed it using a mixture of green and yellow Rit Dyemore dye. I added fake nails painted black as well as some texture lines to give them a bit more realism.